Monday, November 10, 2014

First Look at Ulta Contour Kit - Review & Swatches

ULTA Contour Kit, Retail Price: $18 USD

Ulta has a new Contour Kit which retails for just $18. This is an affordable dupe of the It Cosmetics My Sculpted Face Palette (it looks almost identical in layout to it) and Anastasia Beverly Hills Contour Kit . This would make a wonderful Stocking Stuffer or holiday gift to one of your friends/nieces/sisters or just any all-around makeup lover.

Sometimes when I'm using my Anastasia Beverly Hills Contour Kit I have pangs of guilt in my heart because using it on a daily basis means my favorite shades will run out that much quicker (the pan sizes are smaller)! The ULTA Contour Kit, with its lower price tag, and overall good quality is quickly becoming my go-to daily face palette!

ULTA Contour Kit, Retail Price: $18 USD

Overview & Packaging

When you open the palette up, the powders are covered with a sanitary overlay which is meticulously taped down to the top and bottom of the palette (the great news is that there is no sticky residue when you remove this tape). This palette has a clear window, which is ideal for seeing the colors through the packaging - this is especially important for a makeup hoarder like me that rummages through so much makeup each morning. There's even a super useful guide on the clear front which shows you where to place bronzer, shadows and highlights for contouring.

The one downside to the clear window of the palette is that it makes this palette less than ideal for traveling since the window is rather soft and your powders can get gouged. If you must travel with this palette, I suggest using some cardboard in between the window and the powders before closing it shut to secure your products.

ULTA Contour Kit, Retail Price: $18 USD

What's Inside: Shade Breakdown

You receive two highlighters, one of which is pink-based (Radiance Highlighter) and the other which is yellow-based (Lustre Highlighter). For my complexion, I regularly use yellow-based highlighters because they cancel out the blue undertones in my under-eye circles and even camouflage rosacea (redness). Both of the highlights have a shimmer finish.

The Kit comes with a whopping four matte bronzers, yowza, one to match every skin-tone! There's a light golden bronze (Warmth Bronzer), a medium bronzer (Golden Bronzer), an orange-based bronzer (Bombshell Bronzer), and a cooler, taupe-leaning deep dark bronzer (Goddess Bronzer). I love that they are all matte bronzers and the you can choose the right color for your current complexion, no matter how light or dark you may be.

Swatches of ULTA Contour Kit

Swatch Quality

The matte shades all swatch very evenly, though I do have to admit that there was some powderiness to all of these shades, with some chalkiness being apparent in the Goddess Bronzer.

The shimmer shades feel the same to the touch but swatch more unevenly, the shimmer bits almost seem to separate from the rest of the base color when they are spread out. This isn't necessarily unusual for shimmery shades, but it is more apparent in this palette than in higher-end brands. I'm a little bit disappointed that the shimmer seems to disappear if you blend out the highlighter and doesn't remain as prominent on the face.

Dupes

This palette has a Goddess Bronzer which is darker than any found in the Anastasia Beverly Hills Contour Kit, and also has Lustre Highlighter which is a shimmery version of Banana from Anastasia's palette. The Radiance Highlighter is very similar to Sand from the Anastasia palette because it is a shimmery light pink illuminating shade.


The palette even contains one double-sided Get The Look card, explaining how to use the contouring shades and even suggesting ones to use for light and medium skin tones. I'm a little disappointed they only included these 2 skin-tones since there are olive and dark complexions as well. Of course, I always deviate from cards and suggest everyone just choose which shades appeal to them most!

Overall


ULTA got a lot of things right in this palette, it's light-weight and functional, shows the names of the products clearly and has them laid out in a logical manner. The shade curation was masterful and there's something everyone can love about this palette. The only critiques I have are about the durability of product packaging during travel and the way the shimmer disappears when the highlight shades are blended. Overall, I really think this is a great buy, especially if you can use any one of the promotional codes that ULTA sends out.

If you'd like to see more comparisons of this palette against others, leave me a message below and I'd be happy to work on those for you! I hope this review helps out because when I was purchasing this online I didn't see any reviews of it anywhere and it was really scary being the guinea pig, but I'm so glad I took the plunge!

Monday, November 3, 2014

Winter Wonderland Wedding featuring Lover.ly Feathers Dress

Winter Wonderland Wedding

Winter Wonderland Wedding by lethalglam

To check out the full makeup look that compliments the Feathers dress, visit this blog post. This project was completed in collaboration with the website Lover.ly where you can go to Save inspirations, Shop & Plan everything about your future wedding!

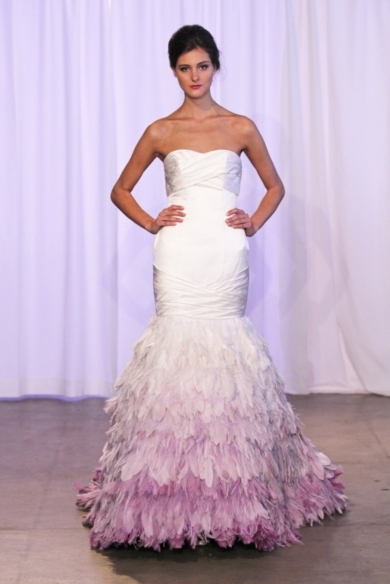
I chose the feathers & ombre lavender dress because I love the way it hugs the body and makes the bride look like a swan transforming into a beautiful princess (very reminiscent of The Swan Princess).

I wanted to continue the ombre gradually getting darker down to the floor by pairing this dress with the lavender suede pumps. It was very simple to pick out a classic french manicure to match the pumps, even down to the silver line detail separating the pink base coat and white tips to match the silver bars above the heels of the pumps.

Since the weather is quickly changing and the first snowstorms of the season have hit North America, I found a Winter Wonderland theme appropriate, especially since the feathers of this dress are so inspired and would probably insulate the wearer quite well! A beautiful feminine white coat with a fur collar is such a natural pairing.

A sleek, simple yet sophisticated updo without too much fuss is so appropriate for this dress because I didn't want it to take away from the overall look by drawing too much attention. However, when the bride turns around there is an unexpected elegance flowing from the volume of her hair.

For accessories, Alexis Bittar offers some very complementary silver jewelry with small clusters that are reminiscent of feathers or angel wings. Dangle earrings are perfect with the sleek updo. I wanted to accentuate the elegance of the collarbone by choosing not to pair a necklace with this look. The bangle can be worn as an option or the bride can opt for the sleek finger-less lace gloves (for a very Swan Lake inspired look).

Bridal Makeup for Lover.ly Lavender Feather Dress


I've been wanting to show some bridal looks on my blog for awhile and the perfect opportunity came up! This relatively easy light smokey lavender eye makeup perfectly matches the Feathers dress by Kelly Faetanini on Lover.ly. If you want to take a look at the wide variety of wedding dresses featured on their website. I have also uploaded a Polyvore collage to show you how I would accessorize the dress for a Winter Wonderland Wedding, including everything from pumps to jewelry and a matching coat!

And now, since I know you're dying to find out what the wedding dress looks like, here it is:

Feathers dress - Retailer: Kelly Faetanini found on Lover.ly
This dress was an easy choice for me since the fitted criss-cross wrapped bodice accentuates curves nicely and is a very traditional look, but right below it is a spectacular avant-garde pop of feathers and color: ombre lavender! Purple just happens to be my favorite color of all so this dress was just a match made in heaven!

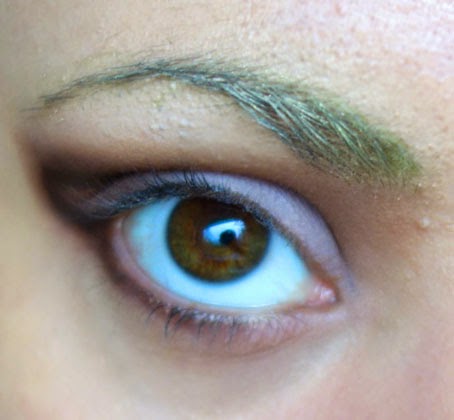
For the completed makeup look, specifically for the eyes, I wanted to pull in the ombre lavender of the dress which goes up and down the length of it. On my eyes, the ombre goes from the inner corner (where it is lightest) to the smokey lavender outer corner (where it is darkest), this effect very closely mimics the dress. The dramatic winged eyeliner and cut crease are reflective of the feather appliques of the gown. Since this dress undoubtedly flutters dramatically when the bride walks, I wanted to add some delicate false eyelashes for the eyes to flutter as well.

The complexion of my skin was kept snowy bright and I used a light pink blush for a natural flush of color but plenty of highlighter to reflect the light reflectivity and sheen of the dress' silk satin fabric. I wanted to use a more saturated (so my lips stand out), but still natural, lip color so that it doesn't compete with the color of the dress. The overall look is classic-elegant, with a slight twist of the unexpected pop of color.

Without further ado, let's proceed onto the makeup look:


I like to start clean makeup looks by doing my eyes and finishing it off with the face so I can achieve a flawless finish on my skin (so excuse the lack of face makeup and concealer at first!). I filled my eyebrows in prior to starting the eyeshadow look.

I used Essence Eye Sorbet as an illuminating pink hued base all over my lid (in shade 04 illuminating plum). As a transition base for my eyelid I used the Physicians Formula Quad in Canyon Classics using the bottom right-most terracotta shade in the entire crease, bottom left-most shade in the outer edge of the crease, and the off-white shade under my eyebrows.


I used an angled liner brush to apply a rough outline of the wing with the matte black eyeshadow from the LORAC PRO Palette. This is good for mapping out the location of your wing on both eyes before you go in with your favorite liquid liner, it ensures your wings will be even on both sides!

I created a faux cut crease shape above my natural crease to give my eyes a larger appearance, using the NYX Cosmetics Hot Singles Eye Shadow in Own The Night (dark smokey purple). I blended out that extra cut crease with a medium matte brown, specifically NYX Cosmetics Hot Singles Eye Shadow in Coquette

I also added a pop of shimmer and lightness to brighten the inner corner of my eye with Annabelle Mineral Pigment Dust in the color Prism but you could also substitute with the NYX Loose Pearl Eye Shadow in White Pearl. 


To create extra drama, I applied Ardell Lashes in 102 Demi Black and applied mascara. You can really use any mascara you'd like but I find that volume-enhancing mascaras do a really great job of camouflaging false eyelashes, so I went with the Rimmel Scandaleyes Retro Glam Mascara.

I also applied black liquid liner on top of my guidelines from the previous step to achieve a crisp look and carried the matte black eyeshadow into my waterline and right underneath my eye.


For my bottom lashes, I switched to Tarte Lights, Camera, Lashes! Mascara because I was looking for a lengthening and separation effect, to make my eyes appear wide open and larger. The synthetic, sparse bristles on the wand from Tarte's mascara is ideal for lash separation. 

To add some sparkle to the inner corner and in keeping with the Winter Wonderland Wedding frosty theme, I added a tiny amount of LORAC 3D Liquid Lustre in Diamond. I absolutely love the way this gives an elegant tiny sparkle rather than a large chunky glitter effect, it's perfect for the holidays and weddings (or any other classy special events in your life).


For lipstick, I chose to go with Essence Long Lasting Lipstick in Barely There! for a plum-leaning my-lips-but-better nude. I figured since I would keep the complexion relatively light (since it is wintertime and heavy tans are unlikely) and the dress is white on top, there could be some added drama in the eyes and lips.


I applied my foundation and did some basic contouring with the Anastasia Beverly Hills Contour Palette. Bridal looks tend to be more soft and subtle rather than highly contoured as you want to look as fresh and natural as possible. Avoid using contour shades that are too dark, a good rule of thumb is to use a powder that is 2 shades darker than your skin tone and apply contour to areas you want to send to the background of your face, such as the hollows underneath your cheekbones.

Try to use a foundation that doesn't have SPF as this causes a flash-back in photographs and can make your face appear rather ghostly on your special day!


I did my own makeup for my wedding day and I highly encourage you to do the same, because no matter how good of a makeup artist you employ, you will know your skin-type, eye shape and habits better than anyone else.

I also suggest trying to use false lashes on multiple occasions leading up to the big day so that you are used to them since they can feel rather "heavy" and potentially uncomfortable on the eyes initially until you get used to wearing them.

I hope you enjoyed my look and draw some inspiration from it for the holidays, your big wedding day, or any other occasions you may have coming up!

Friday, October 31, 2014

Magic: The Gathering Nissa Revane Inspired Makeup


Up next in the Magic: The Gathering Makeup Series, we have Nissa Revane! She has seen a lot of renewed love from the card Nissa, Worldwaker from the M15 set. She is a nature-mage and of the elven race. 

This look was definitely more involved than the Chandra Nalaar look I did yesterday since it involved a lot of facial markings and it was more difficult for me to achieve the right facial proportions, seeing as her head is lean, long and her features are quite harsh (contouring ftw!). 

Here's the concept and art that I based this look of Nissa Revane on:
Magic: The Gathering, Wizards of the Coast - Artist: Jaime Jones, 2009
 As before, I'm happy to take you through all the steps involved in creating this labor of love!


Start with a completely bare face, cover up any redness (and general other color you may have) to achieve a creamy smooth complexion. I used a ton of concealer all over my face, including my eyes and eyebrows - I really caked it on my eyebrows since the reference art shows Nissa with very fine brows.


The next step was adding Taupe on my lid, Sable as my transition shade and Espresso to define a larger domed shape around my eye to create the elongated elf-eyes and change my proportions. All colors used were from the LORAC PRO Palette . I made sure to add brown eyeshadows all the way up to my eyebrows around the inner corner since she has a triangular eye look.


I used a NYX Retractable Eye Pencil Brown  to define the fake new crease I created to make the dimensions of my eyes approximately 1/3rd larger. Then I took a light green eyeshadow from my Coastal Scents 88 Original Palette to subtly create some nature elf eyebrows.


I also blended out the liner with brown eyeshadows and carried them under my eye as well to create a cohesive look. I padded Cream from the LORAC PRO Palette onto the inner to center part of my eyelid to create a brightening effect.


e.l.f. Dramatic Eyelashes were applied and topped with a black Physicians Formula eyeliner to create a more defined look.


Then my camera died for a little while so I don't have intermittent photos. I contoured my face and nose by carrying the brown from my eyeshadow down the sides of the bridge of my nose. I minimized my nostrils and the tip of my nose by also applying some contour shades from the Anastasia Beverly Hills Contour Kit (a mixture of Fawn and Havana).

I applied tape to the straight lines in the makeup, which you can see above. Then I mixed brown and black eyeshadow from the Coastal Scents 88 Original Palette and colored along the edges of the tape. I also used my brown eyeliner to draw guidelines where the markings on her face begin and end so I could connect them symmetrically - however, I would suggest you use a nude eyeliner because I had to go back and conceal the brown color where I didn't apply color.


The lips were an adventure! First, I lined my lips with the NYX Retractable Eye Pencil in Brown. This created a pretty harsh look, just what I was going for! Then I created an ombre by smudging the liner out with a darker brown, then I worked up to a medium brown in the center of my lips. I think they turned out looking rather earthy.


After lots more tweaking and perfecting with concealer, make-shift post-it curved stencils, and free-handing spiky designs, we have a completed look! Phewf! I do have to say this look probably took me about 2 hours to get right, I was surprised just how long it took me to get the contour of my eyes to be slightly less human and more elvish.


Happy Hallowe'en everybody! Hope you enjoyed this look!
Related Posts Plugin for WordPress, Blogger...