Showing posts with label how to. Show all posts

Friday, October 31, 2014

Magic: The Gathering Nissa Revane Inspired Makeup


Up next in the Magic: The Gathering Makeup Series, we have Nissa Revane! She has seen a lot of renewed love from the card Nissa, Worldwaker from the M15 set. She is a nature-mage and of the elven race. 

This look was definitely more involved than the Chandra Nalaar look I did yesterday since it involved a lot of facial markings and it was more difficult for me to achieve the right facial proportions, seeing as her head is lean, long and her features are quite harsh (contouring ftw!). 

Here's the concept and art that I based this look of Nissa Revane on:
Magic: The Gathering, Wizards of the Coast - Artist: Jaime Jones, 2009
 As before, I'm happy to take you through all the steps involved in creating this labor of love!


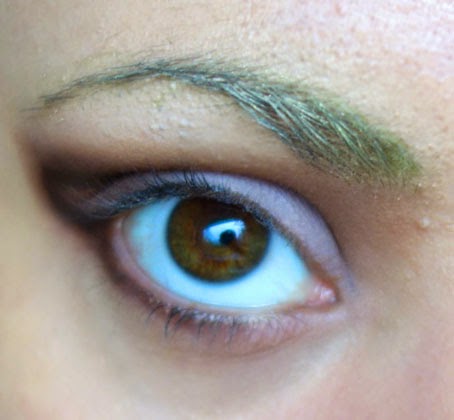
Start with a completely bare face, cover up any redness (and general other color you may have) to achieve a creamy smooth complexion. I used a ton of concealer all over my face, including my eyes and eyebrows - I really caked it on my eyebrows since the reference art shows Nissa with very fine brows.


The next step was adding Taupe on my lid, Sable as my transition shade and Espresso to define a larger domed shape around my eye to create the elongated elf-eyes and change my proportions. All colors used were from the LORAC PRO Palette . I made sure to add brown eyeshadows all the way up to my eyebrows around the inner corner since she has a triangular eye look.


I used a NYX Retractable Eye Pencil Brown  to define the fake new crease I created to make the dimensions of my eyes approximately 1/3rd larger. Then I took a light green eyeshadow from my Coastal Scents 88 Original Palette to subtly create some nature elf eyebrows.


I also blended out the liner with brown eyeshadows and carried them under my eye as well to create a cohesive look. I padded Cream from the LORAC PRO Palette onto the inner to center part of my eyelid to create a brightening effect.


e.l.f. Dramatic Eyelashes were applied and topped with a black Physicians Formula eyeliner to create a more defined look.


Then my camera died for a little while so I don't have intermittent photos. I contoured my face and nose by carrying the brown from my eyeshadow down the sides of the bridge of my nose. I minimized my nostrils and the tip of my nose by also applying some contour shades from the Anastasia Beverly Hills Contour Kit (a mixture of Fawn and Havana).

I applied tape to the straight lines in the makeup, which you can see above. Then I mixed brown and black eyeshadow from the Coastal Scents 88 Original Palette and colored along the edges of the tape. I also used my brown eyeliner to draw guidelines where the markings on her face begin and end so I could connect them symmetrically - however, I would suggest you use a nude eyeliner because I had to go back and conceal the brown color where I didn't apply color.


The lips were an adventure! First, I lined my lips with the NYX Retractable Eye Pencil in Brown. This created a pretty harsh look, just what I was going for! Then I created an ombre by smudging the liner out with a darker brown, then I worked up to a medium brown in the center of my lips. I think they turned out looking rather earthy.


After lots more tweaking and perfecting with concealer, make-shift post-it curved stencils, and free-handing spiky designs, we have a completed look! Phewf! I do have to say this look probably took me about 2 hours to get right, I was surprised just how long it took me to get the contour of my eyes to be slightly less human and more elvish.


Happy Hallowe'en everybody! Hope you enjoyed this look!

Thursday, October 30, 2014

Magic: The Gathering Chandra Nalaar Inspired Makeup!


For Hallowe'en (and even going past the season) I decided that an interesting series to do would be Magic: The Gathering inspired makeup! I've wanted to do this for awhile now since my husband is *really* into the game and we often go to tournaments and engage in the community. My husband has done a lot of border extensions and artwork so I figured a good way to express my artistic aptitude for the game would be using the only canvas I actually know how paint on: my face.

Here's what Chandra Nalaar looks like in Magic: The Gathering:

Credit: Magic: The Gathering, Artwork by Steve Argyle
I took a series of photos that breaks down how to achieve this look if you're interested!


Start with a bare face, apply primer to your skin and a foundation that matches your skin-tone. Conceal your eyebrows using concealer (you can also use glue and light powder but I didn't think this was necessary for this look).


Then I used a burgundy red eyeshadow to fill in my eyebrows to get a better match to Chandra's auburn fire-burned brows. She has a brown undertone in the artwork, so my natural color played well with this, if you're a blonde you may want to mix brown and red eyeshadow to create an auburn effect.


I used Urban Decay's single eyeshadow in Freelove (golden vibrant peach) in my crease and applied an orange eyeshadow from the Coastal Scents 88 Original Palette. I used this nifty trick of applying some tape extending out in a line from my lower lash line to achieve a precise edge - make sure to press the tape on the back of your hand a few times before applying it around your delicate eye area to make sure the adhesive is weak.


Near the lashline, roughly apply a matte black eyeshadow, I used the one from the LORAC PRO Palette. Then, on my lid, between the bold orange I applied in the previous step and above the Black shade, I used Garnet (or a deep, shimmery red) from the same palette.


I defined the line with my Physicians Formula liquid eyeliner in Black to get a very crisp and bold edge. Then I used the Coastal Scents palette and put the yellow-most shade all around the inner corner of my eye.


I used the liquid eyeliner to create a second "wing" going downwards in a sideways "V" shape from the original wing. The final look is achieved by further smoking out only the top of the liquid eyeliner with more Black eyeshadow. I also accented my inner corner and inside the sideways "V" with NYX Loose Pearl Eye Shadow in Yellow Gold. I also applied falsies, e.l.f. Essential Dramatic Eyelashes to be exact.


I smudged black eyeliner along the lower waterline of my eye and then smoked it out with the same Black eyeshadow. Then I used the NYX Cosmetics Loose Pearl Eyeshadow Pigment in Rust underneath to connect and transition between the yellow color accents. I wanted to add the extra yellow to represent "sparks"!


You can use any red lipstick or lip-stain as long as it isn't pink-leaning as a base for the lips. After applying that all over, I used NYX Cosmetics Loose Pearl Eyeshadow Pigment in Rust and right in the middle, I applied the pigment in Yellow Gold (the same ones I used on my eyes).


To finish off the entire face, I used the Yellow Gold pigment as a highlight on my cheekbones, down my nose, forehead, cupid's bow and chin. Then I transitioned to the Rust pigment and used that contour my cheeks and create the "hollows" that add definition and create a more overall "fiery" effect.

I hope you like the look I created!

If you create a look inspired by this series, I really hope you show it to me on Twitter or leave a comment below the post linking to it!


"Of course you should fight fire with fire. You should fight everything with fire"

- Jaya Ballard, task mage

Friday, September 19, 2014

Too Faced Everything Nice: Eyes of the Day Look

Too Faced - Everything Nice Night-time Look - Ambient Lighting
I just couldn't wait to create a look with the Too Faced Everything Nice palette I reviewed yesterday, so today I decided to achieve this Night-time look with quite a few of the colors in the palette. I also started this out with a Daytime look for those of you who are into a more subtle eyeshadow application. I'll show you which colors I used from the palette to create this look.

Too Faced - Everything Nice Daytime Look - Natural Lighting
For the daytime look, I kept it simple and classy, appropriate for work and not too dramatic, this is why I skipped out on using a black eyeliner and just applied mascara (in this case I used L'Oreal Voluminous Butterfly mascara). I did not apply any makeup to my lower lash line - I usually avoid doing this in the daytime because if there is a good amount of sunshine, it can be irritating to my eyes and I can tear up, causing makeup to smear.


First, I used Dream On in my crease in a sweeping motion, to create the backdrop for my crease shade.
Then I used Be You as my crease shade in a more precise usage than Dream OnAll Over You was applied all over the lid and blended into my crease shade. Turtle Dove was applied to feature out my crease transition as a browbone highlight, right under my eyebrows. Secret Lovers was applied to the outer corner of my eyelid in a V-shape to create a 3D effect.

Too Faced - Everything Nice Night-time Look - Natural Lighting
 For Night-time, I wanted to vamp up the look and really pump it up full of saturated colors, since the lighting becomes more dim, I wanted the colors to really pop and stand on their own.

Too Faced - Everything Nice Night-time Look - Natural Lighting
You can see that my basic look is the same as the Daytime look because I essentially just built on from there, adding on top. Another big difference is the addition of liquid eyeliner at the very end and layering it with Chocolate Moon to get a sparkly slightly smoked out, fully opaque effect. 


I added Too Glam to the inner third of my lower lash line and Head Over Heels to the outer third (be careful with this shade because the large glitter particles can hurt your eyes if you don't stick to the outer edge of your lashes). I warmed up my crease color to by adding more pink to the transition shade using Kindness is Free with a very light hand. Then I took this same shade and went in a large V-shape below the outer third of my bottom lash line for continuity and so there is no harsh break between my skin and the dark navy blue (Head Over Heels).

Too Faced - Everything Nice Night-time Look - Ambient Lighting

 Hope you guys enjoy these looks and I'll try to use the other shades from the Everything Nice Set an upcoming Eyes of the Day post! If you're interested, you can purchase it at Sephora.


Monday, July 21, 2014

Eyes of the Day: Amrezy Palette

Eyes of the Day look with Amrezy Palette - Natural Light

Today's featured look of the day consists of neutral eyeshadows with a pop of emerald green from the Anastasia Beverly Hills Amrezy Palette. I was so excited to play with this palette, I just couldn't wait to create a look!

Eyes of the Day look with Amrezy Palette - Ambient/Indoor Light
This look was easy to create and the green is meant to appear as a pop of color so I didn't try too hard to blend it with the lid color. I was extremely drawn to the Emerald eyeshadow and Caramel ended up being a lot more tangerine than I was expecting, so I was glad I didn't choose Morocco... these shadows are very pigmented! The photos don't even do this look any justice, the bright sunshine of the day really makes for a dramatic, impactful combination.


Here are the quick steps to re-create this emerald glam look (using the Anastasia Beverly Hills Amrezy Palette):

  • Caramel all over the lid
  • Glisten on the inner corner of the lid
  • Emerald in the crease
  • Blend out Emerald with Vanilla as the highlight between it and the brow
  • Line the lower lash line with Emerald
  • Physicians Formula 2-in-1 Lash Boosting Eyeliner + Serum in Ultra Black (review coming soon!) to create winged eyeliner
  • Rimmel Lash Accelerator Mascara in Extreme Black to gently define lashes (this mascara will separate and darken lashes but not volumize or lengthen but it is very lightweight and easy to wear throughout the whole day)


Tuesday, April 15, 2014

Should I floss before or after I brush my teeth?

I don't know if you've ever thought about this topic, but the other day I found myself wondering: Should I be flossing before or after I brush my teeth and use mouthwash? So I researched the topic and found out some pretty logical results. 

When we're young our dentists tell us just to floss once a day, because that's good enough, if you're doing that you're staving off gingivitis and potential periodontal disease (severe gum disease) and removing unwanted plaque from building up. It takes plaque 24-48 hours to "settle" and solidify in your mouth, if you are flossing once every 24 hours you will not form floss in the areas that you agitate with your floss. 

My personal favorite tools to floss with are flosser dental picks. I think they make the job so much more enjoyable, and I make sure to leave them out somewhere very visible so that every single day I will see them and be reminded to use them. To top that off, I even have an alarm which sets off every night before bedtime to remind me of Flossy Time.

After much thorough research, I saw that this is a highly contested topic. Some dentists apparently don't care when you floss as long as you do floss once a day, specifically at night. It's important to floss at night before you sleep because during the night, since you aren't using or opening your mouth quite so much, and your saliva proliferates at much slower pace, the bacteria have their reign in your mouth. Bacteria are free to settle, move around, and cause disturbance in your mouth undisturbed as you sleep. So it's important that the majority of your dental care routine happens before you sleep. 

I discovered that it's important to floss before you go to sleep, the reason behind this is that it will dislodge any rogue food particles or impurities. After doing this, it is the opportune time to floss with a fluoride toothpaste and use mouthwash to ensure your mouth is clean for as long as possible throughout the night.

Guide to oral health

Related Posts Plugin for WordPress, Blogger...