Showing posts with label Tutorial. Show all posts

Friday, October 31, 2014

Magic: The Gathering Nissa Revane Inspired Makeup


Up next in the Magic: The Gathering Makeup Series, we have Nissa Revane! She has seen a lot of renewed love from the card Nissa, Worldwaker from the M15 set. She is a nature-mage and of the elven race. 

This look was definitely more involved than the Chandra Nalaar look I did yesterday since it involved a lot of facial markings and it was more difficult for me to achieve the right facial proportions, seeing as her head is lean, long and her features are quite harsh (contouring ftw!). 

Here's the concept and art that I based this look of Nissa Revane on:
Magic: The Gathering, Wizards of the Coast - Artist: Jaime Jones, 2009
 As before, I'm happy to take you through all the steps involved in creating this labor of love!


Start with a completely bare face, cover up any redness (and general other color you may have) to achieve a creamy smooth complexion. I used a ton of concealer all over my face, including my eyes and eyebrows - I really caked it on my eyebrows since the reference art shows Nissa with very fine brows.


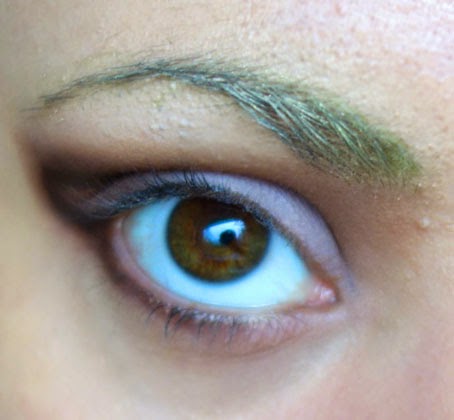
The next step was adding Taupe on my lid, Sable as my transition shade and Espresso to define a larger domed shape around my eye to create the elongated elf-eyes and change my proportions. All colors used were from the LORAC PRO Palette . I made sure to add brown eyeshadows all the way up to my eyebrows around the inner corner since she has a triangular eye look.


I used a NYX Retractable Eye Pencil Brown  to define the fake new crease I created to make the dimensions of my eyes approximately 1/3rd larger. Then I took a light green eyeshadow from my Coastal Scents 88 Original Palette to subtly create some nature elf eyebrows.


I also blended out the liner with brown eyeshadows and carried them under my eye as well to create a cohesive look. I padded Cream from the LORAC PRO Palette onto the inner to center part of my eyelid to create a brightening effect.


e.l.f. Dramatic Eyelashes were applied and topped with a black Physicians Formula eyeliner to create a more defined look.


Then my camera died for a little while so I don't have intermittent photos. I contoured my face and nose by carrying the brown from my eyeshadow down the sides of the bridge of my nose. I minimized my nostrils and the tip of my nose by also applying some contour shades from the Anastasia Beverly Hills Contour Kit (a mixture of Fawn and Havana).

I applied tape to the straight lines in the makeup, which you can see above. Then I mixed brown and black eyeshadow from the Coastal Scents 88 Original Palette and colored along the edges of the tape. I also used my brown eyeliner to draw guidelines where the markings on her face begin and end so I could connect them symmetrically - however, I would suggest you use a nude eyeliner because I had to go back and conceal the brown color where I didn't apply color.


The lips were an adventure! First, I lined my lips with the NYX Retractable Eye Pencil in Brown. This created a pretty harsh look, just what I was going for! Then I created an ombre by smudging the liner out with a darker brown, then I worked up to a medium brown in the center of my lips. I think they turned out looking rather earthy.


After lots more tweaking and perfecting with concealer, make-shift post-it curved stencils, and free-handing spiky designs, we have a completed look! Phewf! I do have to say this look probably took me about 2 hours to get right, I was surprised just how long it took me to get the contour of my eyes to be slightly less human and more elvish.


Happy Hallowe'en everybody! Hope you enjoyed this look!

Wednesday, April 30, 2014

Colorful / Festival Eye Look of the Day


This look I decided to re-create was inspired by Julia Graf's Arab Inspired Eye tutorial from YouTube. If you'd like watch it, I have linked it below.


My rendition of this look differs in several ways. First of all, I did not use full length false lashes, I was debating not using any at all and I used Too Faced's Fiber Lash Mascara, but then I did decide to throw on some Demi Wispies (just a pair I bought in a 10-pack off eBay, really anything comfortable works). I pulled my eyeliner out a little further, I tried using gel or cream but it didn't look as black as I wanted so I finished off the liner with Kat Von D's eyeliner in Trooper. I also mostly used colors from the Urban Decay Electric palette and some of my MAC single shadows. I also didn't use a white base, I used my MAC Studio Finish Concealer in NC15, because I actually have to go pick up NYX's Milk pencil.


I'll basically list for you the colors that I used for pinks, purples, etc. to achieve this look. Now while it's not exactly like Julia's, it's definitely quite similar!

Yellow: MAC "Chrome Yellow"
Orange: Urban Decay "Slowburn" from Electric Palette
Chartreuse Green: Urban Decay "Thrash" from Electric Palette
Aqua: MAC's "Aquadisiac"
Pink: Urban Decay "Savage" from Electric Palette and Too Faced "Bright Eyes" from Be Bright Holiday Set
Purple: Urban Decay "Urban" from Electric Palette
White: MAC's "Nylon"
Black Eyeliner: Kat Von D "Trooper" and Clinique Black Kohl Eyeliner for waterline


Hope you guys enjoy this look and definitely head on over to Julia's website for some awesome tutorials!

Saturday, January 4, 2014

NYC New York Color Eyeshadow Trio Tutorial

I received a NYC New York Color Eyeshadow Trio in the color 781 "Long Beach Sands" in my Jolly Voxbox from Influenster (more on that in a later post) and I was challenged to create a look and write a tutorial on how to achieve it! This is a very affordable product, especially for makeup beginners who are uncertain of which colors may look good on them (this is a good place to start), these retail for $2.99 in the US (prices may vary by country). It comes with a highlighter (the top shade), an all over lid color (the middle shade) and a crease tone (the bottom shade) as well as an applicator. The guides on the package are only meant to help out but you can certainly mix these colors around to achieve different looks. The texture of this is very fine and super blend-able so don't be afraid to try out various different shades in the product line.

I think a neutral eyeshadow look is one that will flatter many skin-tones, now obviously the darker your skin, the deeper the shades you should use and some of these colors may be too faint or the change in coloration may be too subtle. You can always opt for more contrast in your color choices so I always choose a very light shade and a much darker shade so that they pop more against each other (the top and middle shade of this trio work well together in that respect).


To achieve a subtle and daytime smokey eye with this trio of colors, use your darkest tone (or the middle color in the trio) closest to your lash line and sweep it across. Patting the color on with a fine tipped or thin angled brush will allow you to give the appearance of eyeliner.  Use the midtone (or the bottom-most color of the trio)  on the medium portion of your eye and then the lightest highlighter tone (the top color of the trio) on the crease of your eyelid. This will create a subtle gradient which is suitable for day time activities or night time fun!


Friday, October 18, 2013

DIY Nail Polish Tutorial

Have you ever seen a nail polish color on TV or on someone else that you really liked? And yet you haven't been able to find that shade and purchase it? Or are you just sick and tired of paying $10-$20 for a decent nail polish. Here's a quick way to make your own colors... the possibilities are limitless!

This tutorial might be just the thing you need to spruce up your hallowe'en look this year, too!

You'll only need some very basic materials:

  1. clear nail polish or top coat (preferably one that you like and has staying power for best results)
  2. eyeshadow color you really love (or more! You can mix these together for unique color combinations) - this can be a pigment or just an eyeshadow in a pan/palette
  3. empty container (optional) - this is only if you're making smaller quantities and you don't want to use your entire clear nail polish for one DIY color
  4. toothpick
  5. funnel made from a rolled up piece of paper and taped together


Steps to Making Your Very Own Nail Polish!


  1. First gather all of your supplies.
  2. Use your toothpick to pick off some of the nail polish you have and mix different colors together to achieve what you like. In the photo above you can see pink and brown were mixed for a coral hue.
  3. Transfer your pigment or powdered nail polish into the clear nail polish OR if you do not want to contaminate your clear polish, funnel the pigment and some clear polish into another container with a lid.
  4. Close the container and shake.
  5. Apply your fabulous new color to your nails!


I highly encourage you to give this tutorial a try, it's super simple and fun. You'll be so happy with all of the amazing compliments you get and the surprise answer you'll give people when they ask you where you got that beautiful polish!

Happy crafting, everyone!

Related Posts Plugin for WordPress, Blogger...