Showing posts with label how to. Show all posts

Tuesday, April 8, 2014

Electric Blue Liner Eyes of the Day


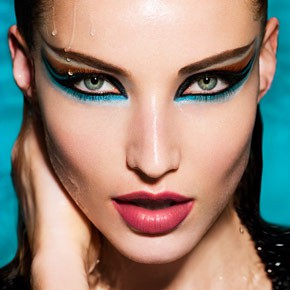
Electric blue eyeshadow is something I always gravitate towards, especially if it's more of a cerulean blue or turquoise shade... however, I always struggle to find ways to incorporate pops of color (especially for spring) without looking clownish. I think this overall understated elegant look (on the lid & crease) with a classic eyeliner is perfect for that extra pop on the lower lash line.


I will tell you that I am not crazy about jamming too much product in my waterline (especially along the inner and outer corners) because I find that my eyes will tear more throughout the day and my makeup will get ruined! So I use a minimal amount of makeup in the waterline for extreme comfort and all day wear (but you could always put more product in your waterline if you prefer).

Here are the products I used for this look (it seems like a lot but it really isn't, I just like to mix and match products from various companies!):
  • Eyes primed with E.L.F. HD Lifting Concealer (I've been experimenting with new eye bases and this one works very well and also eliminates staining from highly pigmented minerals such as in the UD Electric Palette!)
  • Urban Decay eyeshadow in Hustle (mine is depotted and put into an old MAC palette, pictured above)
  • MAC eyeshadow in Retrospeck genereously applied all over the crease
  • STILA stay all day liquid wateproof eyeliner in Black (not pictured) - this is my staple eyeliner - to create that cat-eye winged look
  • Urban Decay's Chaos eyeshadow from the Electric Palette on the outer 2/3rd's of my waterline
  • Beneath Chaos, I used Urban Decay's Gonzo also from the Electric Palette to smoke it out and smudge the harsh line
  • On the inner corner of lower lash line - Stila's Smudge Stick Waterproof Eye Liner in Empress to draw the light in and make me appear more awake (see swatch below)


  • Upper lash mascara - Tarte's Lights Camera Lashes (only 1 coat)
  • Lower lash mascara - Max Factor Vivid Impact Mascara in 910 (bought these off eBay and they're AWESOME - but more of a dry formula and they have a synthetic brush) - the blue really didn't compete with the blue shadow I was using and this was ideal for my look
Close-up of the completed look:

I hope you're all doing well and having a wonderful beginning of Spring!

Thursday, March 13, 2014

How to Get a Dewy Complexion


1. Exfoliate - make sure you wash your face with a gentle exfoliater with microbeads (as these tend to be the most effective) or use your cleanser with a soft silicon exfoliating pad. These should be done about 3 times a week for ideal results. I don't recommend doing extreme chemical peels as these can sometimes cause harsh skin reactions and may remove even healthy skin layers. The ideal exfoliation practice removes only the oldest, dead skin cells on the outermost surface of the skin and reveals the healthy, glowing layer underneath. Sugar scrubs, salt crystals, pumice, loofahs, sponges and microfiber cloths all can achieve the same results. Getting rid of dead skin cells and build-up naturally means that your makeup will go on smoother and you will avoid nasty clumps.

2. Moisturize - you'll want to use an emollient to make the outer layers of your skin more pliable and soft, this increases the skin's hydration level (or water content). Usually moisturizers tend to be a little bit fatty and may have a greasy feeling on the skin, but these lubricants really do make an enormous difference to the way your makeup (specifically foundation) will apply and last on your skin. If you have dry skin, it is extremely important to use a heavier moisturizer or even a dry oil - this will reduce your makeup's patchiness if used well in advance of application.


3. Use a liquid highlighter and a moisturizing foundation - Some women prefer to use their highlighter over top of their foundation, however I have found that for the most natural looking results and to blend your highlighter seamlessly into your foundation, you will want to mix the highlighter you are using (in my case this is the Stila All Over Shimmer Liquid (Shade 03 - Rose Gold)) with a moisturizing foundation of your choice (my favorite is The Body Shop Moisture Foundation in Shade 04). I use equal parts and mix them on the back of my hand with the Real Techniques Expert Face Brush.
Equal parts liquid highlighter (Stila All Over Shimmer)
and foundation (The Body Shop Moisturizing Foundation)
Mixed together on the back of my hand with Real Techniques Expert Face Brush


4. Highlight and contour your face - For a maximized dewy complexion, apply a powder highlighter (such as Stila's Kitten Highlighter) to the areas on your face which should reflect light and a bronzer (such as Wet n Wild Coloricon Bronzer - Ticket to Brazil ) to the areas on your face you would like to recede to the background. Here's a handy infographic on highlighter/bronzer placement.


Saturday, January 4, 2014

NYC New York Color Eyeshadow Trio Tutorial

I received a NYC New York Color Eyeshadow Trio in the color 781 "Long Beach Sands" in my Jolly Voxbox from Influenster (more on that in a later post) and I was challenged to create a look and write a tutorial on how to achieve it! This is a very affordable product, especially for makeup beginners who are uncertain of which colors may look good on them (this is a good place to start), these retail for $2.99 in the US (prices may vary by country). It comes with a highlighter (the top shade), an all over lid color (the middle shade) and a crease tone (the bottom shade) as well as an applicator. The guides on the package are only meant to help out but you can certainly mix these colors around to achieve different looks. The texture of this is very fine and super blend-able so don't be afraid to try out various different shades in the product line.

I think a neutral eyeshadow look is one that will flatter many skin-tones, now obviously the darker your skin, the deeper the shades you should use and some of these colors may be too faint or the change in coloration may be too subtle. You can always opt for more contrast in your color choices so I always choose a very light shade and a much darker shade so that they pop more against each other (the top and middle shade of this trio work well together in that respect).


To achieve a subtle and daytime smokey eye with this trio of colors, use your darkest tone (or the middle color in the trio) closest to your lash line and sweep it across. Patting the color on with a fine tipped or thin angled brush will allow you to give the appearance of eyeliner.  Use the midtone (or the bottom-most color of the trio)  on the medium portion of your eye and then the lightest highlighter tone (the top color of the trio) on the crease of your eyelid. This will create a subtle gradient which is suitable for day time activities or night time fun!


Monday, October 14, 2013

DIY Beauty Hacks All Girls Should Know

1. Use a light-colored frost eye shadow to create luscious 3D lips. Or use a different eyeshadow color for more depth and an ombre effect.

Use pale frosted eyeshadow to get fuller, 3D lips.

2. Use Elmer's Glue to remove blackheads just like the Pore Strips only much cheaper. Use it only on your nose or on your entire face (avoid your eyes, nostrils and mouth). Apply gauze before the glue is dry for easier removal of the glue, otherwise just peel or rub it off.

http://midwestmodernmomma.com/no-more-expensive-pore-strips-for-me/

3. Use Elmer's Glue as a nail polish base for easy to remove glitter manicures. All you have to do is peel from the side! This manicure can last up to 2 weeks.

Want to wear glitter nail polish without going through the pain-in-the-ass removal process?

4. Apply one coat of Elmer's Glue on your cuticles and around your nail and let it dry, then apply your nail polish. Remove the glue by peeling it off and it will give you the perfect manicure.

26 DIY Beauty Hacks (no mess nail polish with glue...)

5. Twist your hair into two pieces and then twist them around each other. Hold the ends down and run a flat iron over them slowly up and down in the direction of the swirls. The end result will be soft waves.

263230_490910857644441_421509142_n

6. Basics of eyeshadow application: 1 and 2 should be your lightest color. 4 should be your next lightest tone applied to the eyelid, 3 should be a darker mid-tone shade which goes into the crease. 5 should be the darkest color, applied in an outer v-shape to define the shape of your eye.


7. Use a light shade of shimmer eyeshadow in the inner corner of your eyes for a refreshed and bright appearance.

27 DIY Beauty Hacks Every Girl Should Know

8. Use a rubber band to fix your french manicure.

Use a Rubber Band to Fix Your French Manicure - 40 DIY Beauty Hacks That Are Borderline Genius
http://paperraindrops.blogspot.com/2012/02/french-manicure-cheat.html

9. Know where to apply perfume so it lasts all day:

Know where to apply your perfume so it lasts all day.

10.  Make your own perfect, custom BB cream.

http://beautyvancouver.com/2013/07/02/d-i-y-bb-cream/
11.  The perfect eyeshadow colors for your eye color.


12. Turn any eyeliner into a gel eyeliner. This also works for turning lip pencils into lip gloss.

Turn any eyeliner pencil into super-intense gel liner.

13. Use white eyeliner or base all over your eyelids to make any eyeshadow color pop with brightness. Use black eyeliner or base all over to make colors more intense and smokey.


14. To cover up dark circles, apply concealer in a triangle under your eyes. Orange shades of concealer will combat blue undertones of dark circles.

Cover up dark circles by applying concealer in a triangle shape.

15. Apply concealer, paint pots, eyeshadow base, or Maybelline's Color Tattoo cream eyeshadows as a base under your powder eyeshadow to achieve a more professional look and more staying power.


16. Want plumper lips? Add Peppermint essential oil to your favorite lip gloss to get those bee-stung lips without having to pay a high price!

Instead of shelling out for Lip Venom, add a drop of peppermint oil to your favorite lip gloss.

17.  To make your lipstick last all day, remember to "set" it by blotting off excess product with a napkin and then dusting translucent powder over your lips with a large fluffy brush.


18. Make your eyelashes longer and more full with baby powder. Use a clean mascara spoolie to grab some baby powder, shake off the excess and then comb it through your lashes. Apply your mascara and your lashes will appear thicker and longer!


19. Do you need to tame your eyebrows? Use a clean mascara spoolie (can be from an old mascara you used up) and dab it into petroleum jelly or aloe vera gel. Then run it through your eyebrows for a clean, tamed look that will last all day.


20. To make your red lipstick last all day and to avoid bleeding, line your lips with a matching color of lip liner. To achieve the most natural look, rub the lip liner all over your lips rather than just around the edges.


21. To get the perfect ballerina bun, use a bun filler from any store or make one of our a sock that you cut the toes off of. Roll the sock around itself to create a donut.


22. To get rid of split ends twist your hair around itself and cut off the pieces that are sticking out.
http://www.diyncrafts.com/3312/fashion/40-diy-beauty-hacks-borderline-genius/12

23. Out of dry shampoo? No problem, make your own with this simple recipe.

http://bridebird.com/how-to-create-your-own-dry-shampoo/

24. Turn Kool-Aid into a lipstain.


25. Contour your face to add dimension and thin out your features by using this simple guide.

highlight and contour guide blog
http://blog.spaboutique.ca/tag/jane-iredale/

26. Creating the perfect cat-eye with eye liner.

http://www.pinterest.com/pin/116178865360397704/

27. Make your own lip scrub/exfoliator.

http://theberry.com/2012/10/11/just-a-few-beauty-tips-6-photos/beaty-tips-1/

28. How to do an easy flawless french manicure with paper hole protectors.

http://www.popcosmo.com/2012/05/04/how-to-do-a-french-manicure-effortlessly/

29. Achieve a polka dot manicure using a band aid.

Easiest nail art EVER.
http://thebeautythesis.com/2012/11/13/polka-dot-nails-using-a-band-aid-why-didnt-i-think-of-this/

30. Check your makeup in the sunlight. The daylight will expose any mistakes you may have made in an unnaturally lit room.


31. When applying eyeshadow use at least 3 brushes to keep your look from becoming one-tone and muddy.
http://blush-berry.blogspot.com/2008/09/basic-makeup-set.html
32. Use visine to tone down the redness of pimples.

Wikihow

Saturday, February 18, 2012

Wearing metallic eyeliner


It comes as no surprise to me that plenty of times when I see women wearing metallic eyeliner they just simply try to line their upper lashes with it and it gives for a very unappealing look, because I used to do this until I knew better. A much more beautiful way to line your eyes is to first apply your metallic eyeliner in whatever medium you have it (most are pencil but you can make it a liquid eyeliner by rubbing some on your brush and making a paste with Visine as the mixing medium, trust me, this works wonders) and then going right under this line with a black liquid liner for a precise and beautiful contour to your eyes. This way the metallic color won't change the way your eyes look (like bringing out the red in them) but will simply frame them. This technique is very simple and practical.

Even if you don't have metallic eyeliner you can mix eyeshadow with Visine and rub a thin angled brush into the mixture and proceed to line your eyes. There is a wide range of infinite possibilities with this because you can conceivably turn *any* of your eyeshadow colors into liners! How exciting is that, your makeup can now do double duty!

When the eye isn't contoured by a darker shade, the gold brings out the red tones in the eye

Check out the difference between these two metallic blue eyeliner applications. On the left you see an application that is not contoured by black or a darker shade and it looks downright ghoulish. This isn't an attractive look, even for a model. Makeup should enhance your features and not distract away from them. On the right, the blue is enhancing the model's natural eye color by being pushed out of the way of her own blue eyes by that black contour.


Related Posts Plugin for WordPress, Blogger...