Saturday, February 18, 2012

Wearing metallic eyeliner


It comes as no surprise to me that plenty of times when I see women wearing metallic eyeliner they just simply try to line their upper lashes with it and it gives for a very unappealing look, because I used to do this until I knew better. A much more beautiful way to line your eyes is to first apply your metallic eyeliner in whatever medium you have it (most are pencil but you can make it a liquid eyeliner by rubbing some on your brush and making a paste with Visine as the mixing medium, trust me, this works wonders) and then going right under this line with a black liquid liner for a precise and beautiful contour to your eyes. This way the metallic color won't change the way your eyes look (like bringing out the red in them) but will simply frame them. This technique is very simple and practical.

Even if you don't have metallic eyeliner you can mix eyeshadow with Visine and rub a thin angled brush into the mixture and proceed to line your eyes. There is a wide range of infinite possibilities with this because you can conceivably turn *any* of your eyeshadow colors into liners! How exciting is that, your makeup can now do double duty!

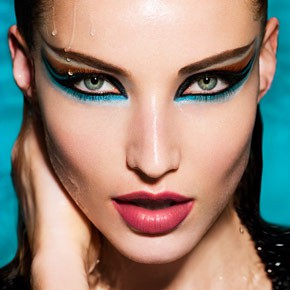
When the eye isn't contoured by a darker shade, the gold brings out the red tones in the eye

Check out the difference between these two metallic blue eyeliner applications. On the left you see an application that is not contoured by black or a darker shade and it looks downright ghoulish. This isn't an attractive look, even for a model. Makeup should enhance your features and not distract away from them. On the right, the blue is enhancing the model's natural eye color by being pushed out of the way of her own blue eyes by that black contour.


Friday, February 17, 2012

Friday Fun Day

Friday Fun Day


Knitted Dove pocket dress
$55 - modcloth.com

Sheer dress
$48 - modcloth.com

Oasis narrow shoes
$68 - asos.com

Flower handbag
$26 - amazon.com

Wing earrings
$295 - alexisbittar.com

Dorothy Perkins rhinestone ring
$15 - dorothyperkins.com

H M flower hair accessory
£1.99 - hm.com


This is a dream outfit for Friday Fun Day (aka today), the day before the long weekend (Family Day in Canada and President's Day weekend in the US). Start your long weekend off right by looking cute as can be! I have an obsession and fondness for Patricia Locke jewelry, especially since my adoring in-laws got me a beautiful bracelet for my birthday! My new color combination of choice is, oddly enough, metal tones with forest green, yellow and peachy pink! Hope this inspired you in some way to bring spring into your wardrobe!

DIY: Make Your Own Lip Scrub

Last weekend, I went into LUSH and impulse-bought a 'Bubblegum Lip Scrub' for $8, which is very pricey considering it really is just a sugar-based product that you scrub your lips with to smooth them out before applying lip balm or lipstick. I'd never tried lip scrubs before so I decided I would purchase this one to see what they should be like. I later noticed that I could make my own very simply so I figured I would save you all the time and money of going to LUSH and purchasing one (or getting one from any other makeup house, to be frank) by teaching you how to make your own.


What you'll need:
- Sugar in the raw (brown sugar but you can use white if you don't like or own brown sugar) - you want the sugar to be very coarse and not finely milled
- olive oil
- vaseline or petroleum jelly
- 100% aloe vera gel (come in container from drugstore or if you have a natural aloe plant you can squeeze it out of the leaves)
- chapstick or flavoring and food coloring of your choice (some people use honey but it is too sticky for my preference but it is always an option)
- clear glass jar (you can use any jar but I think it looks better in a small clear jar that you can easily carry around - small baby food container works very well for this)

You'll want to use about a teaspoon of vaseline, half a teaspoon of aloe vera gel, one quarter teaspoon of olive oil, one third of a chapstick (cut it off the stick) or smaller amounts of your flavoring/coloring agents, and as much sugar as will fill up your container and mix it all together until you get a paste-like consistency and the color/flavor is even throughout your jar. You  may want to mix it all in another bowl and trasfer it into your jar later, I find that this allows you better control over the consistency you're getting. When you are finished, this will be instantly gratifying because you can use it right away, it doesn't need to be stored in the fridge or anything like that, and you can use it as often as you'd like without worrying about how much it cost for you to purchase it because you can remake it anytime!

Thursday, February 16, 2012

Product Review: Salon Express Nail Art Stamping Kit

I recently purchased this nail art stamping kit from Salon Express at the Rite Aid (you should be able to find it in many drugstores) in the 'As Seen on TV' section. I was intrigued by it because it seemed simple enough to use so that I could achieve salon-quality manicures without  paying a whole lot. The whole kit should cost you about $8-$10, so for that price I considered that it would be worth a try.

The kit comes with the following items:
5 metal stamping plates with various designs (as seen in the picture below)
1 stamper
1 scraper
1 stamping plate base


This kit is fairly simple to use if you read how to do it or watch a youtube video on how it's used, but it's also pretty self-evident. You place a metal stamping plate of your choice (whichever one has a design you like and want to use) onto the stamping plate base. Then you take a nail polish (preferably opaque so it shows up better) of thicker consistency and place it on top of the design stencil stamping plate. Then you take the scraper and run the blade over the design to wipe away any excess polish. Finally, using the stamper you want to quickly pick up the design from the stamping plate by pressing it pretty thoroughly onto the design and then rolling it onto your finger nail to transfer the design.

This is a fairly simple tool to use but it can be time-consuming so if you like to spend time on intricate nail designs, this is the cheapo product for you, but if not, don't bother investing in it. However, if you are really into perfect, precise looking nail designs, you may want to invest in a better set, such as the one Konad makes. Some of the designs on the stamping plates are really thin and over-complicated and will not show up on your nails because they do not transfer properly. You also cannot use glitter nail polish for the designs or anything that isn't very opaque and in stark contrast to your base coat of nail polish because the designs won't show up at all or appear smudged. With these drawbacks in mind, I still really like this product because it is very inexpensive and with a little effort you can have really cool designs that are sure to stand out! This was my first attempt at using the stamper with their cheetah print design. I was happy with the results.

Give Yourself Galaxy Nails


If you're like me and you need something to put on your nails so you don't bite them or pick at them or just to plain strengthen them and you're sick of the same old nail polish colors in your collection, spruce up your nails with this new galaxy look! 

This nail polish application looks like it would be really difficult, right? Well, it's not, and all you need is: a pair of tweezers, a makeup sponge, toothpicks, and nail polish colors (I suggest black, navy/dark blue, rosy pink, yellow, and white).

First, apply a coat of black nail polish to your nails and let it dry. Secondly, you'll want to get the makeup sponge and rip a small piece off of it and pick it up with your tweezers and dip the sponge in white nail polish. Make sure you only use very little polish when you do this or it will look blotchy and apply in a nebula-like line or constellation over your nail, leaving some black showing on the sides. Sponge some yellow nail polish in the middle of the 'white nebula'. Next, sponge on some rosy pink polish, keeping it near the yellow you have already added to get a multi-dimensional effect. Finally, sponge on some navy or dark blue polish around the edges of the nebula so that you can create a gradient effect or fade it into the black background. You can always clean up around your nails with nail polish remover if you need.

If you use a toothpick and dab it into the white nail polish and then quickly draw little stars around your nails,  you will achieve small constellations of stars around your nebula. Dot around the nebula as you can't see as many stars inside the nebula. At the end, you can add a few larger stars. Use fine glitter polish to create even smaller stars but make sure that the glitter will  not overpower your design or completely mask it. This layer should be fairly thin! Then add a topcoat for staying power and you're done with your fabulous galaxy nails design!

You can use other colors such as orange, green and purple to your design, just make sure you keep it cohesive and you do the same thing on all of your nails so they look like a set!  Good luck and have fun experimenting with outrageous galactic nails

DIY: Braided Infinity Scarf


This is a nifty, new idea I came across and wanted to share with you all because it is an absolutely simple do-it-yourself project that can be customized in numerous ways! To bear the cold weather out there, make yourself this beautiful and practical braided infinity scarf. Viscose jersey works well in all seasons, however, it's light enough that you can wear it in the summer but if you build the scarf bulky enough it will keep you warm in the winter.

You will need to purchase jersey fabric (it is easiest to work with but you can try other types of fabric, especially once you get comfortable with the technique), enough so that you can braid the fabrics together and wrap them around your neck loosely and they fit over your head. You will probably need 1 yard of fabric per scarf you make because you can cut it with fabric shears or scissors lengthwise to make multiple pieces. If you want your scarf to look full and rich, you should use more fabric so that it hugs the neck luxuriously and doesn't look like it was made out of scraps.

All you do is make a small braid with some smaller segments of the fabric, a medium sized braid with middle-sized pieces and a large braid with larger chunks of the fabric. Then you want to leave one piece un-braided so that you can get that fuller look on the bottom. Sew your pieces together in a large infinity circle so that the seam comes to the back of the wearer's neck, make sure all of the pieces are attached to one another. If you add clip-on buttons at the back, you will be able to make one or all of the pieces interchangeable so that you can adjust your look anytime you want!

You can do this in multiple color combinations or fabric styles and patterns, be as creative as you like with this simple project. You'll have the most unique scarf and I can guarantee you that nobody will have its duplicate!

Here are some beautiful fabric recommendations that would make absolutely breathtaking DIY scarves! Happy crafting, everyone!

Wednesday, February 15, 2012

The best Valentine's Day gift ever!!

So obviously I have the best husband in the world, that's a given, but he chose to go above and beyond that status and surprise me with what I've always wanted this Valentine's Day: a Temptu Pro Airbrush Intro Kit!!! I never thought I was going to get one of these because he got me, as a wedding present, the Sephora edition of the at-home Temptu airbrush for dummies and that product was a whiff. The cheap plastic hose inside of the air gun broke on me about 4 times and I had to keep returning it to Sephora until I just gave up on that cruddy plastic product. But not this puppy, oh no, this one is made out of solid metal and dozens of pieces that can all be taken apart and put back together again for thorough cleaning! I got the silicone-based makeup as it lasts longer and has more staying power than water-based products. 
This intro kit includes:
- S-one compressor
- 12 S/B Foundation bottles
- 8 S/B blushes and highlighters in various colors
- S/B primer
- airbrush moisturizer
- S/B airbrush cleaner
- concealer wheel
- TEMPTU PRO Airbrushing DVD
- airbrush cleaning kit
- TEMPTU PRO SP-35 Airbrush


This kit comes with absolutely all the essentials and everything you need! The foundations range from extremely fair to dark skin tones and even if you're fair skinned you can use the darker tones for bronzing or contouring, so having all of the options to mix colors together is amazing, you can literally achieve any shade you want! The blushers and highlighters include all the colors I would ever ask for, as well. There's a pinkish hued blush and some darker reddish blushes, but you can control the amount you put on so easily that even using one of the brighter colors isn't scary, the application is smooth, sheer and flawless. I'm a huge fan of this kit and how professional I feel using it! It really isn't very difficult to use at all as long as you follow the instructional DVD before you do anything.

So back to my point: best Valentine's Day gift ever!!! Actually, make that best "any occasion" gift ever!!!

Related Posts Plugin for WordPress, Blogger...