Showing posts with label fashion. Show all posts

Tuesday, March 27, 2012

Get the Katniss Everdeen Eyelashes!

Lead makeup artist on the set of The Hunger Games, Ve Neill, used Paperself individual lashes for Katniss Everdeen (played by Jennifer Lawrence) for the 'Girl on Fire' look during the closing ceremony of the movie. Effie Trinket (played by an unrecognizable Elizabeth Banks) also wears a variety of interesting and fascinating Paperself full-set of eyelashes. For the Katniss Everdeen look, makeup was fairly subtle, except for when she was being paraded around The Capital and her face was contoured and accentuated by a golden bronzer to make her look sun-kissed.


Effie Trinket had very complex makeup where her face was entirely made pale with powder and dusted with pink eyeshadow. Her lips were concealed around the corners and pink was used in a heart-shape to accentuate her pout. Her eyeshadow was a smattering of various colors, in the picture above it is fuschia applied generously and her brows are concealed and lightened. She has some black eyeliner on top of her eyes and then these Paperself eyelashes are applied (they can be found at Sephora or Amazon below). Even her waterline was lined with pink eyeshadow to continue the look.


You can get your very own pair of these eyelashes online by clicking on these banners at:

Thursday, March 15, 2012

New Jewelry Retail Website

Hi guys, sorry I've been MIA for a few days now, but it's been for good reason: I've been working extremely hard on this website http://www.bonanza.com/booths/LethalGlam where I'm looking forward to selling my creations! Sometimes I just can't help it and I design jewelry, all types too - bracelets, earrings, and necklaces in various styles, so I decided to try and turn that into a business. I hope everyone enjoys it and here's a quick sneak peek at some of the pieces up for sale:


The shop is definitely at a lower price point and it sticks to the motto I live by where you shouldn't need to have lots of money to look fabulous! I'll be putting up new pieces all the time, there's currently 79 lots up for sale so please check it out. I'll also take commissions for what you'd like to see or custom pieces!

http://www.bonanza.com/booths/LethalGlam

Sunday, February 26, 2012

Pastel Dream Lookbook

Pastel Dream Sunday


Foil dress
fashion.1stdibs.com

ASOS bucket bag
$50 - asos.com

Studded jewelry
$15 - topshop.com

Pastel Bangle Set
$25 - oasis-stores.com

Pastel Dream Sunday

Pastel Dream Sunday


Foil dress
fashion.1stdibs.com

ASOS bucket bag
$50 - asos.com

Studded jewelry
$15 - topshop.com

Pastel Bangle Set
$25 - oasis-stores.com


Pastels are all the rage this spring, so if you're obsessed with trends, make sure you adhere to this girly,  romantic one! I'm a big fan of the mint mixed with peach and pink with a hint of gold. Mesh is a great mix with this girly combination to add a touch of toughness! Hope you're all having a great weekend and wonderful Sunday, see you tomorrow with more posts <3 


xoxo,
Alex

Thursday, February 23, 2012

Hairstyles for your age: your 40's and 50's

Welcome to the second installment of 'Hairstyles for your age'! This is the mid-life segment where I'll be writing about women in their 40's and 50's, who are hopefully more carefree about their appearance than their younger selves and have the confidence to pull off whatever look they please! It's important to choose a look that reflects your personality and lifestyle, just as it was in your 20's and 30's. The only rule and important thing to adhere to when considering your hair is to be true to yourself.

Your 40's:
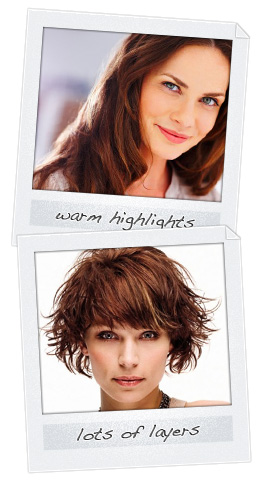
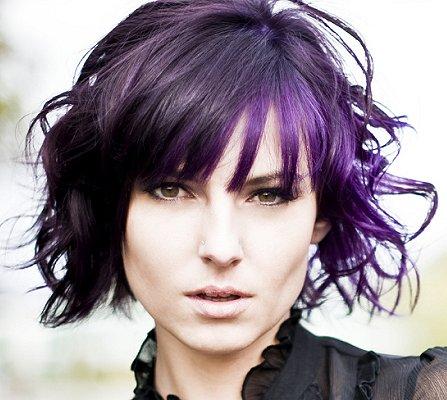
It's important that you take care of your hair as it will get more and more brittle and dry, so you may want to consider oil treatments weekly and go for regular hair trims, anyways from every 4-6 weeks on average. Layers are a great idea if you don't want your hair to appear flat and to avoid tangles. If your hair is starting to go lighter naturally (if you're getting gray hairs) you may want to consider getting highlights so that they camouflage the need to color every 3 weeks or so, you can get away with color every 5-6 weeks if you manage to get plenty of dimension from the highlighting of your hair. The general rule of thumb is that skin tends to get paler as we age, so your hair should match, you will want to go about 2 shades lighter than your natural hair color when it comes to coloring and even lighter should you choose highlights. Warm highlights, rather than cool tones, will bring more redness to your face and give you that 'naturally blushing' appearance that young faces have! Wispy short hair is also a good choice, especially if your hair is too coarse to control long or if it is too thin and would become to weak if you continued to grow it out long. Consider getting lots of layers to improve your hair's appearance and give it a more vibrant, youthful appearance.

You will want to stay away from ombre hair where the darker color is on top and then the tips are lighter because if you have gray hair, once it starts to grow in, it will be like a white line where the part of your hair is against the stark dark brown of your hair or black. You  may want to consider reverse ombre hair which is a funky trend and can make you appear more youthful and draw attention away from your roots. The roots are basically a very light blonde and the tips are a darker shade of brown, creating a beautiful gradient, this gives almost the appearance of a goddess. Ombre vs. reverse ombre hair is pictured below, if you have gray hairs you want to stay away from ombre (pictured on the left) but may want to consider reverse ombre (pictured on the right) to camouflage your grays.


Your 50's:
The most important thing to remember in your 50's is that you are not old and even if you were, you are not doomed to a short hairstyle. If you take care of your hair and it is maintained beautifully, you will never have to go short, as long as you can grow it and it looks good, you will never have to resort to short hair unless you do so because of preference. What is flattering at this age is hair that is about shoulder length, such as a beautifully groomed bob that contours your  face. If you're a career woman, keeping up with the younger ladies in your field will be difficult so you will have to maintain your hair color, or go bold and stand out by dying your hair silver like Meryl Streep in 'The Devil Wears Prada' (I loved this look and think it looks absolutely beautiful). Whatever you do, make sure the haircut you choose is one that will flatter the shape of your face and masque any wrinkles that you're seeing on your face (bangs might be a good choice if you have many forehead wrinkles, for example).

Make sure that the style appears natural and not too fussed over because anything that appears to 'worked on' can be dated and out of style, if you have long hair go for beachy waves rather than severe curls or dead straight hair. If you have short hair, go for a romantic style rather than a spikey style that is best suited for a 20-year-old punk rocker chic. Again, make sure that you are sticking to a lighter color, especially because darker hair colors will bring out the wrinkles in your face a lot more than light hair colors which will bring light to your face rather than creating uncomfortable shadows. If you are still uncomfortable with light colored hair, then consider just using highlights over top of your darker hair color, but I do recommend at least going chestnut rather than a blackish brown. Remember that layers and soft highlights, mid-length or shorter hair is beautiful to frame your face at this age.


Sponge Manicure Nail Tutorial

This is the look the tutorial will give you, apply a final coat of fine clear glitter if you do not want a matte finish
Sponge manicures are increasingly popular and easy do-it-at-home-yourself projects. You can create a myriad of various color and shape combinations to create the most interesting manicures you've ever seen. This is not a manicure for those who are all about perfection because the randomness is what creates beauty in this type of look. So if you like speckles and soft blends of colors as well as gradients, this is the manicure for you!

What you'll need:
- Base coat
- Base color
- Paper towels
- Sponge (either art sponges or makeup sponges)
- Tweezers
- Nail polish colors of your choice - one bottom color, and one intermediate color between base color and tip color
- Top coat
- Glitter (optional)
- Acetone
- Q-tips

I suggest first trying this look with a white base color as any other accent color will look vastly different compared to the white coat and you can easily see what you are doing with the sponge, allowing you better control of your technique. Make sure not to buff your nails, because you want them to be slightly gritty for this manicure because if the nail is porous, instead of smooth and shiny, you will have an easier time applying your color. Make sure that before you start anything, you lay down a paper towel so you don't ruin the desk you're working on with polish. First, apply your bast coat of nail polish and let it thoroughly dry. Then, apply your base color (white in my case) and make sure to concentrate it on the lower third of your nail near the cuticle but lightly coat the entire nail. You will not need more than one coat of this base color.

You can then apply an intermediate color on the middle third of your nail (if you chose to go with blue as the tip color then you would want to pick something like a lighter baby blue to make it look like a gradient going from white to blue). Make sure to apply this intermediate color to the middle third of your nail using a sponge portion that you have ripped off an art or makeup sponge and holding it gently with your tweezers. Make sure not to over-saturate the sponge with polish, it may be a good idea for you to wipe any excess polish onto a paper towel before applying it to your nail. In the sponge manicure, less is more, you want to build it up rather than have to take away polish (which usually will result in having to start the manicure over again).

Then, to apply your tip color, which should be the darkest of the colors you have chosen, for example a fully saturated blue or one with glitter in it, you should use another sponge after your previous coats have completely dried. You don't want to apply the colors while the previous application is still wet because they will muddle together and the stickiness of the previous coat will ruin the manicure. If you find that your gradient is not sufficient, you can go back in with the sponge and dip it alternating in both colors to go over the line where the colors meet to improve the gradient. Let everything dry and apply a top coat, especially if you've chosen a glitter nail polish to add to the tips so that the glitter doesn't move and to make your nails appear shiny as well as for staying power. Use some acetone and q-tips to clean up around the sides of your nail if you have gotten nail polish on your fingers.
Starting with a blue base and finishing with a green tip, covering with green glitter will give you this look
Starting with a pink/mauve base and princess pink in the middle and finishing with a white tip you can get this look by adding bronze colored lines with circular tips using a toothpick or fine-tipped brush
Starting with a red base, orange middle and yellow tip, and drawing on palm tree silhouettes with black will give you this


If you're interested in purchasing a kit to get you started, Konad makes a wonderful one that you can purchase here (btw this is a great deal because these usually sell for around $20):


Wednesday, February 22, 2012

DIY: Make your own braided headband


Want to reuse your old cotton t-shirts and don't know what to do with them? If you feel bad about throwing them out (and you should) you should re-purpose them into braided headbands! You can make these for yourself or give them as gifts to your friends and family, it's a super-cute idea and you'll have unique headbands to match all of your outfits.

What you will need:
- cotton t-shirt that you're willing to cut up or scraps of cotton fabric
- hair elastic (cut to open it up so it is an elastic strand)
- scissors
- needle
- thread

The size that you cut the strips from which you will make your headband should all be the same width in size (I suggest using about an inch in width from your t-shirt cotton material from the bottom of your tee) and cut 3 equal pieces. You should now have 3 round pieces from your t-shirt and you want to cut one side of them so that they double in length and open up from the circle shape into a line. Obviously the thinner the strips, the thinner your headband will be. It's best to start out a little thicker so you have room for error when you're sewing the ends together to close your headband.


Then tie a knot at one end of the strands to secure that side while you braid. Begin to braid with your 3 strands regularly and try to work in a tight braid as it gives a more orderly and beautiful appearance. Tie the other end down when you're done braiding. Measure the size you want the braided part to be, you must now cut one side and sew your hair elastic to the end of the braid. It helps to wrap some thread around the elastic after you have sewn to make it extra secure. Then use a small rectangular piece of the fabric to cover the sewing you just did (because it will not look flattering) and fold it in half so you have a thicker piece, you can either glue this onto the junction between your braid and elastic or you can sew it on (I prefer glue for a seamless finish). Repeat all of this at the other end so that you complete your headband! It's important that you use the elastic to finish off your headband because, unless you're using an elastic fabric for the entire headband, it won't be able to fit snugly against your head and will either fall right off or be too loose. Make sure to measure it to your head before you sew the final side together.

There are many variations of this that you can do, you can consider double or triple braided headbands, you can use various kinds of fabric and mix colors, or you can add rhinestones and jewelry onto your headband when you're done! Just keep in mind that if you want to do double or triple braids, you will want to secure them all together at the back of the braids by using one piece of fabric and elastic. Have fun and play with your accessories, that is what they're for!


Hairstyles for your age: your 20's and 30's

Everyone knows that certain hairstyles look great when you're young but not necessarily as you grow older. We find ourselves looking at others, at times, in shock and awe with what they've done with their hair. The most important consideration at any age is to find a hairstyle that flatters the shape of your face and to take into account the texture of your hair. Coarse hair lends itself better to wearing long hairstyles while short, fine hair should be worn shorter in a layered haircut to achieve fullness and body. Let's be honest, though, under the age of 20, you can basically get away with the biggest hair atrocities and still look good because of that youthful vibrancy!

Find out what you can get away with in your age group

Your 20's: You can try out all kinds of cuts and styles, many opt for the romantic and pretty long hair styles, but others either want to look younger or older so they get shorter haircuts (whether you look younger or older really depends on the style and the competency of your hairdresser). Beware of getting short cuts that are not ideal for your face shape and age, you don't want to end up looking like a cartoon with a boyish mushroom cut. Highlights and lowlights are always a great way to achieve dimension with any haircut, so consider getting them in a tone matching the full color of your hair.


Make sure to always choose a look that fits your age and latest trends. It's important to consider your career since you are most likely establishing what it will in your 20's. If you're more into the arts you can probably get away with some funky colors and fun styles, but if you're in a conservative profession you should steer clear of anything that might be construed as rebellious. 

You should experiment with length and color because this is the time that you can, later on maybe your hair won't grow as beautifully long and your face may not lend itself to trying all sorts of dye colors. In your 20's your hair will grow faster and thicker than any other time in your life, so make sure you take care of it and take advantage of it!


Your 30's
: During these years, you're probably beginning a family or working your way up in your career (if you're lucky, then both) and you can still get away with quite a few styles but you should pick one that fits your lifestyle. If you're busy and need to take care of a baby as well as go to work and look professional, maybe shoulder-length hair is the choice for you so that you can style it more easily than longer hair since there is less of it and  you can throw it up into a ponytail when you're at home. It's simple to curl or flat-iron when you want to look professional or go out on a date with your hubby! Just because you're a mom doesn't mean you can't be sultry, if you want long hair then by all means achieve that long hair, just make sure to take care of it so you don't end up with ratty looking hair.


 Don't be afraid to try new haircuts or go short with your hair, some people just naturally look better with short hair, especially if you have beautiful facial features, they will be highly accentuated without all that hair in the way. If you're starting to have significant amounts of gray hair you can start coloring your hair pretty regularly, or you can ask your stylist to hand-paint the couple of strands of gray that you have in a tone that matches your hair, so that you don't have to color fully. Another great way to camouflage gray hair is to color it with a color of mascara that matches your natural hair (they make mascara in tons of shades now).


Friday, February 17, 2012

Friday Fun Day

Friday Fun Day


Knitted Dove pocket dress
$55 - modcloth.com

Sheer dress
$48 - modcloth.com

Oasis narrow shoes
$68 - asos.com

Flower handbag
$26 - amazon.com

Wing earrings
$295 - alexisbittar.com

Dorothy Perkins rhinestone ring
$15 - dorothyperkins.com

H M flower hair accessory
£1.99 - hm.com


This is a dream outfit for Friday Fun Day (aka today), the day before the long weekend (Family Day in Canada and President's Day weekend in the US). Start your long weekend off right by looking cute as can be! I have an obsession and fondness for Patricia Locke jewelry, especially since my adoring in-laws got me a beautiful bracelet for my birthday! My new color combination of choice is, oddly enough, metal tones with forest green, yellow and peachy pink! Hope this inspired you in some way to bring spring into your wardrobe!

Thursday, February 16, 2012

Give Yourself Galaxy Nails


If you're like me and you need something to put on your nails so you don't bite them or pick at them or just to plain strengthen them and you're sick of the same old nail polish colors in your collection, spruce up your nails with this new galaxy look! 

This nail polish application looks like it would be really difficult, right? Well, it's not, and all you need is: a pair of tweezers, a makeup sponge, toothpicks, and nail polish colors (I suggest black, navy/dark blue, rosy pink, yellow, and white).

First, apply a coat of black nail polish to your nails and let it dry. Secondly, you'll want to get the makeup sponge and rip a small piece off of it and pick it up with your tweezers and dip the sponge in white nail polish. Make sure you only use very little polish when you do this or it will look blotchy and apply in a nebula-like line or constellation over your nail, leaving some black showing on the sides. Sponge some yellow nail polish in the middle of the 'white nebula'. Next, sponge on some rosy pink polish, keeping it near the yellow you have already added to get a multi-dimensional effect. Finally, sponge on some navy or dark blue polish around the edges of the nebula so that you can create a gradient effect or fade it into the black background. You can always clean up around your nails with nail polish remover if you need.

If you use a toothpick and dab it into the white nail polish and then quickly draw little stars around your nails,  you will achieve small constellations of stars around your nebula. Dot around the nebula as you can't see as many stars inside the nebula. At the end, you can add a few larger stars. Use fine glitter polish to create even smaller stars but make sure that the glitter will  not overpower your design or completely mask it. This layer should be fairly thin! Then add a topcoat for staying power and you're done with your fabulous galaxy nails design!

You can use other colors such as orange, green and purple to your design, just make sure you keep it cohesive and you do the same thing on all of your nails so they look like a set!  Good luck and have fun experimenting with outrageous galactic nails

DIY: Braided Infinity Scarf


This is a nifty, new idea I came across and wanted to share with you all because it is an absolutely simple do-it-yourself project that can be customized in numerous ways! To bear the cold weather out there, make yourself this beautiful and practical braided infinity scarf. Viscose jersey works well in all seasons, however, it's light enough that you can wear it in the summer but if you build the scarf bulky enough it will keep you warm in the winter.

You will need to purchase jersey fabric (it is easiest to work with but you can try other types of fabric, especially once you get comfortable with the technique), enough so that you can braid the fabrics together and wrap them around your neck loosely and they fit over your head. You will probably need 1 yard of fabric per scarf you make because you can cut it with fabric shears or scissors lengthwise to make multiple pieces. If you want your scarf to look full and rich, you should use more fabric so that it hugs the neck luxuriously and doesn't look like it was made out of scraps.

All you do is make a small braid with some smaller segments of the fabric, a medium sized braid with middle-sized pieces and a large braid with larger chunks of the fabric. Then you want to leave one piece un-braided so that you can get that fuller look on the bottom. Sew your pieces together in a large infinity circle so that the seam comes to the back of the wearer's neck, make sure all of the pieces are attached to one another. If you add clip-on buttons at the back, you will be able to make one or all of the pieces interchangeable so that you can adjust your look anytime you want!

You can do this in multiple color combinations or fabric styles and patterns, be as creative as you like with this simple project. You'll have the most unique scarf and I can guarantee you that nobody will have its duplicate!

Here are some beautiful fabric recommendations that would make absolutely breathtaking DIY scarves! Happy crafting, everyone!

Wednesday, January 11, 2012

Jason Wu for Target Collection Lookbook

From fashion prodigy, Jason Wu, discovered by most of America and the world after Mrs. Obama wore his frothy white gown to the inauguration ball,comes a collection inspired by 'An American Girl in Paris' for his Target debut. It's wonderful that he has decided to collaborate with Target and make clothes that are affordable to everyone, rather than just the Hollywood elite and the President's wife. There are a whopping 53 pieces in his collection and they range in price from $19.99 to $59.99 for apparel and $19.99 to $49.99 for handbags and scarves. You can find these clothes in Target stores and at Target.com from Feb. 5th to March 6th, 2102. This collection has me very interested because I can see myself in a lot of the pieces so I'll definitely be checking it out! Here are the pieces that I personally believe are going to be most successful and their prices:
Sleeveless Top with Sheer Panel in Navy Floral, $26.99 Pleated Skirt in Navy Floral, $29.99 Also Available in Solid Black Lace Clutch in Black, $29.99
Textured Pleated-Front Peplum Top in Gold, $32.99 Pleated Skirt in Black, $29.99 Also Available in Navy Floral Lace Clutch in Black, $29.99

Long-Sleeve Sheer Blouse in White with Black Ribbon, $34.99 (Available at Target.com only) Also Available in Blush with White Dots Pleated Canvas Skirt in Belize Blue, $29.99 Front-Flap Straw Bag in Cream, $39.99
Poplin Dress in Navy. $39.99

Lace Clutch in Black, $29.99

Flared Dress in Cream with Black Patent Belt, $59.99 (available at Target.com only) Also available in Black with Nude Patent Belt
Long-Sleeved Pointelle Sweater in Red, $39.99 Also Available in Belize Blue Pleated Cap-Sleeved Blouse in Red, $26, 99 Also Available in Gold (Available at Target.com only) Pleated Skirt in Navy Floral, $29.99 Also Available in Solid Black

Trench Coat in Black, $54.99 Also Available in Navy 
Long-Sleeved Blouse in Blush, $34.99 Also Available in Solid White (Available at Target.com only) Lace-Printed Straight Skirt in Blush, $29.99


Related Posts Plugin for WordPress, Blogger...