Showing posts with label t-shirt. Show all posts

Monday, August 20, 2012

DIY Anthropologie-Inspired Hip Cinched Blouse

This is a fabulous DIY t-shirt idea that can be translated into all sorts of different pieces - you can use this technique on the bottoms of shirts, skirts, pant legs, etc. It's really an idea you can take anywhere your creativity guides you!


All you'll need for this project is:
A shirt
1 piece of fabric
1 ribbon
Sewing machine (or your meticulous little fingers and a needle with some color-coordinated thread)


1. Find a shirt and turn it inside out.


2. Lay your ribbon down and cut a piece of fabric large enough to cover your ribbon and pin the piece down


3. Sew on the fabric, making 3 large stitches, between the ribbon and on each side.

4. Cinch and tie and you've completed your project!


Friday, March 30, 2012

DIY T-Shirt Reconstruction


Do you get sick of your T-shirts? Do you have some laying around that are years and years old but you've never worn them because the neck hits too high on your collarbone and bothers you? Do you just really dislike a shirt because it is ill-fitting and unflattering on you? Well, I have tons of those shirts that I can't throw out because they have some sort of memory attached to them or they're not bad per se but I just don't wear them. I came up with the perfect solution: modifying old t-shirts to look like brand new, stylish tops.

I have, at the bare minimum, been altering sleeves and necklines on t-shirts lately and it completely reconfigures the fit. You can opt for cap sleeves, instead of regular sleeves, maybe even transform your tee into a tank or cut-off shirt, and the neckline can be changed from that basic circle shape into a V-neck or low-neckline so you can wear your t-shirt off one or both shoulders. If you find they accentuate your tummy area in unpleasant ways then you can snip the bottom hem of the t-shirt, you can round it out so that it gives the t-shirt a more feminine (as opposed to unisex) base. You can also make cool designs by cutting slits into your t-shirt and then braiding them together (it's even simpler than braiding, all you have to do is loop one segment over the next).

All you need to do this is either a fabric scissors or just a regular scissors (you'll need a little more patience to cut straight lines), you can score where you want to cut for precision, but I don't even bother with that. It's so simple, just make sure you cut the same distance from both sides of the t-shirt so it doesn't end up looking uneven or asymmetrical (unless you're looking for an asymmetrical look, it is your own unique fashion after all).

Once you get more advanced with your snipping and braiding, you can transform your shirts into some amazing fashion-forward pieces:


Wednesday, February 22, 2012

DIY: Make your own braided headband


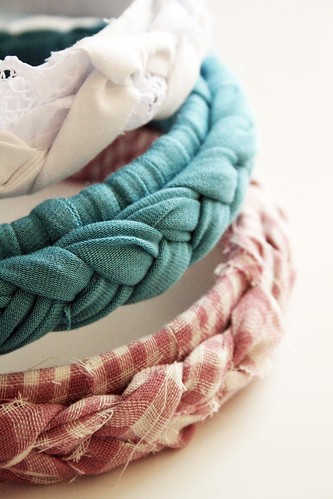
Want to reuse your old cotton t-shirts and don't know what to do with them? If you feel bad about throwing them out (and you should) you should re-purpose them into braided headbands! You can make these for yourself or give them as gifts to your friends and family, it's a super-cute idea and you'll have unique headbands to match all of your outfits.

What you will need:
- cotton t-shirt that you're willing to cut up or scraps of cotton fabric
- hair elastic (cut to open it up so it is an elastic strand)
- scissors
- needle
- thread

The size that you cut the strips from which you will make your headband should all be the same width in size (I suggest using about an inch in width from your t-shirt cotton material from the bottom of your tee) and cut 3 equal pieces. You should now have 3 round pieces from your t-shirt and you want to cut one side of them so that they double in length and open up from the circle shape into a line. Obviously the thinner the strips, the thinner your headband will be. It's best to start out a little thicker so you have room for error when you're sewing the ends together to close your headband.


Then tie a knot at one end of the strands to secure that side while you braid. Begin to braid with your 3 strands regularly and try to work in a tight braid as it gives a more orderly and beautiful appearance. Tie the other end down when you're done braiding. Measure the size you want the braided part to be, you must now cut one side and sew your hair elastic to the end of the braid. It helps to wrap some thread around the elastic after you have sewn to make it extra secure. Then use a small rectangular piece of the fabric to cover the sewing you just did (because it will not look flattering) and fold it in half so you have a thicker piece, you can either glue this onto the junction between your braid and elastic or you can sew it on (I prefer glue for a seamless finish). Repeat all of this at the other end so that you complete your headband! It's important that you use the elastic to finish off your headband because, unless you're using an elastic fabric for the entire headband, it won't be able to fit snugly against your head and will either fall right off or be too loose. Make sure to measure it to your head before you sew the final side together.

There are many variations of this that you can do, you can consider double or triple braided headbands, you can use various kinds of fabric and mix colors, or you can add rhinestones and jewelry onto your headband when you're done! Just keep in mind that if you want to do double or triple braids, you will want to secure them all together at the back of the braids by using one piece of fabric and elastic. Have fun and play with your accessories, that is what they're for!


Related Posts Plugin for WordPress, Blogger...