 |
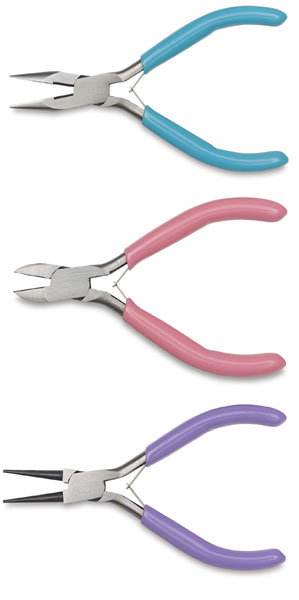
| Flat nose pliers, side cutters and round nose pliers |
First, you will need the long flat-nose pliers (has a light blue handle in the picture) which allow you to easily grip wire and bend it without creating nicks and chips in it. Then it is advisable that you purchase a side cutter (has the pink handle in the photo) because, although the flat-nose pliers has some cutting ability, it will not be strong enough to cut thicker wire, nor will it be able to cut wider objects/findings. Finally, you will definitely be needing the round-nose plier if you plan on using any wire to make earrings or bracelet hoops/links and you should consider doing so because it will give your work a polished and finished look (it is the method that makes store jewelry look expensive as opposed to makeshift). An optional but recommended tool is the crimper - it is a tool that allows you to use little crimp beads that will push your wires together at the ends of necklaces and bracelets and press the bead to collapse in a perfect manner but if you get good at it you can also use the flat-nose pliers to do this.
 |
| Crimping tool |
You should purchase beads that you like and find beautiful, I'm a big fan of Swarovski beads and glass beads, I suggest buying them in 4mm, 6mm, and 8mm sizes, and then you can combine colors that you think are beautiful together. You will need stringing wire to make soft bracelets and necklaces that dangle, I suggest working with sterling silver wire but it tends to be quite pricey so only buy however much you will be needing (measuring helps - so use a measuring tape). For earrings, you will be needing earring hooks, unless you can salvage some from your own jewelry by simply taking off the hanging parts. Make sure you get lots of these because earrings are very simple to make and you can crank out many styles that you like. Keep in mind that all of the products you get should be hypoallergenic, especially if you plan to gift your jewelry to a friend, you never know what can trigger allergies.
Collect jewelry from antique shops and thrift shops, or rummage through your basement or attic for whatever you have laying around that you're unhappy with. My motto is that no piece of jewelry is unsalvageable, anything can be transformed into a piece that is current and stylish. These are the basic tools you need to get started, obviously there are many other things you could purchase, but I recommend starting with these so you're not breaking the bank. All of these tools should cost you $30.00 or less and if something seems to expensive in a store, it probably is. I find that going to designated bead stores actually is a bad idea because they tend to have 'specialty' items and overprice for them. You're better off going to an art store, a hardware store, Wal-Mart, or shopping online (Amazon is perfect for these items). You may want to pick up general findings such as pendants, metal-earring frames, and anything you find interesting. In future posts, I will teach you how to make every piece of jewelry you can imagine, so just get your tools ready and we'll make things together! Here's a sampling of what I can teach you how to make:


No comments :
Post a Comment