Friday, October 31, 2014

Magic: The Gathering Nissa Revane Inspired Makeup


Up next in the Magic: The Gathering Makeup Series, we have Nissa Revane! She has seen a lot of renewed love from the card Nissa, Worldwaker from the M15 set. She is a nature-mage and of the elven race. 

This look was definitely more involved than the Chandra Nalaar look I did yesterday since it involved a lot of facial markings and it was more difficult for me to achieve the right facial proportions, seeing as her head is lean, long and her features are quite harsh (contouring ftw!). 

Here's the concept and art that I based this look of Nissa Revane on:
Magic: The Gathering, Wizards of the Coast - Artist: Jaime Jones, 2009
 As before, I'm happy to take you through all the steps involved in creating this labor of love!


Start with a completely bare face, cover up any redness (and general other color you may have) to achieve a creamy smooth complexion. I used a ton of concealer all over my face, including my eyes and eyebrows - I really caked it on my eyebrows since the reference art shows Nissa with very fine brows.


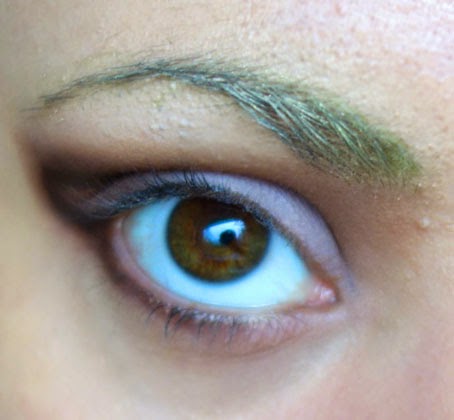
The next step was adding Taupe on my lid, Sable as my transition shade and Espresso to define a larger domed shape around my eye to create the elongated elf-eyes and change my proportions. All colors used were from the LORAC PRO Palette . I made sure to add brown eyeshadows all the way up to my eyebrows around the inner corner since she has a triangular eye look.


I used a NYX Retractable Eye Pencil Brown  to define the fake new crease I created to make the dimensions of my eyes approximately 1/3rd larger. Then I took a light green eyeshadow from my Coastal Scents 88 Original Palette to subtly create some nature elf eyebrows.


I also blended out the liner with brown eyeshadows and carried them under my eye as well to create a cohesive look. I padded Cream from the LORAC PRO Palette onto the inner to center part of my eyelid to create a brightening effect.


e.l.f. Dramatic Eyelashes were applied and topped with a black Physicians Formula eyeliner to create a more defined look.


Then my camera died for a little while so I don't have intermittent photos. I contoured my face and nose by carrying the brown from my eyeshadow down the sides of the bridge of my nose. I minimized my nostrils and the tip of my nose by also applying some contour shades from the Anastasia Beverly Hills Contour Kit (a mixture of Fawn and Havana).

I applied tape to the straight lines in the makeup, which you can see above. Then I mixed brown and black eyeshadow from the Coastal Scents 88 Original Palette and colored along the edges of the tape. I also used my brown eyeliner to draw guidelines where the markings on her face begin and end so I could connect them symmetrically - however, I would suggest you use a nude eyeliner because I had to go back and conceal the brown color where I didn't apply color.


The lips were an adventure! First, I lined my lips with the NYX Retractable Eye Pencil in Brown. This created a pretty harsh look, just what I was going for! Then I created an ombre by smudging the liner out with a darker brown, then I worked up to a medium brown in the center of my lips. I think they turned out looking rather earthy.


After lots more tweaking and perfecting with concealer, make-shift post-it curved stencils, and free-handing spiky designs, we have a completed look! Phewf! I do have to say this look probably took me about 2 hours to get right, I was surprised just how long it took me to get the contour of my eyes to be slightly less human and more elvish.


Happy Hallowe'en everybody! Hope you enjoyed this look!

Thursday, October 30, 2014

Magic: The Gathering Chandra Nalaar Inspired Makeup!


For Hallowe'en (and even going past the season) I decided that an interesting series to do would be Magic: The Gathering inspired makeup! I've wanted to do this for awhile now since my husband is *really* into the game and we often go to tournaments and engage in the community. My husband has done a lot of border extensions and artwork so I figured a good way to express my artistic aptitude for the game would be using the only canvas I actually know how paint on: my face.

Here's what Chandra Nalaar looks like in Magic: The Gathering:

Credit: Magic: The Gathering, Artwork by Steve Argyle
I took a series of photos that breaks down how to achieve this look if you're interested!


Start with a bare face, apply primer to your skin and a foundation that matches your skin-tone. Conceal your eyebrows using concealer (you can also use glue and light powder but I didn't think this was necessary for this look).


Then I used a burgundy red eyeshadow to fill in my eyebrows to get a better match to Chandra's auburn fire-burned brows. She has a brown undertone in the artwork, so my natural color played well with this, if you're a blonde you may want to mix brown and red eyeshadow to create an auburn effect.


I used Urban Decay's single eyeshadow in Freelove (golden vibrant peach) in my crease and applied an orange eyeshadow from the Coastal Scents 88 Original Palette. I used this nifty trick of applying some tape extending out in a line from my lower lash line to achieve a precise edge - make sure to press the tape on the back of your hand a few times before applying it around your delicate eye area to make sure the adhesive is weak.


Near the lashline, roughly apply a matte black eyeshadow, I used the one from the LORAC PRO Palette. Then, on my lid, between the bold orange I applied in the previous step and above the Black shade, I used Garnet (or a deep, shimmery red) from the same palette.


I defined the line with my Physicians Formula liquid eyeliner in Black to get a very crisp and bold edge. Then I used the Coastal Scents palette and put the yellow-most shade all around the inner corner of my eye.


I used the liquid eyeliner to create a second "wing" going downwards in a sideways "V" shape from the original wing. The final look is achieved by further smoking out only the top of the liquid eyeliner with more Black eyeshadow. I also accented my inner corner and inside the sideways "V" with NYX Loose Pearl Eye Shadow in Yellow Gold. I also applied falsies, e.l.f. Essential Dramatic Eyelashes to be exact.


I smudged black eyeliner along the lower waterline of my eye and then smoked it out with the same Black eyeshadow. Then I used the NYX Cosmetics Loose Pearl Eyeshadow Pigment in Rust underneath to connect and transition between the yellow color accents. I wanted to add the extra yellow to represent "sparks"!


You can use any red lipstick or lip-stain as long as it isn't pink-leaning as a base for the lips. After applying that all over, I used NYX Cosmetics Loose Pearl Eyeshadow Pigment in Rust and right in the middle, I applied the pigment in Yellow Gold (the same ones I used on my eyes).


To finish off the entire face, I used the Yellow Gold pigment as a highlight on my cheekbones, down my nose, forehead, cupid's bow and chin. Then I transitioned to the Rust pigment and used that contour my cheeks and create the "hollows" that add definition and create a more overall "fiery" effect.

I hope you like the look I created!

If you create a look inspired by this series, I really hope you show it to me on Twitter or leave a comment below the post linking to it!


"Of course you should fight fire with fire. You should fight everything with fire"

- Jaya Ballard, task mage

Monday, October 27, 2014

Pastel Eyes of the Day Featuring Essence Cosmetics


Recent purchases from Essence Cosmetics have persuaded me to do a one-brand Eyes of the Day look with Essence products. I created this fairy-esque Candy look, just in time for Hallowe'en, using some palettes and Essence eyeliner. It is my experience that the products I used wore all day without any noticeable fading until the 8-9 hour mark.


In my crease, I used the very pigmented orange blush shade called Peach Babe from the Essence "How To Make Your Face Wow" Palette.

On the lid, I applied the violet/purple shade from the Essence All About Candies Eyeshadow Palette.
The jet black eyeliner I used was the Essence Eyeliner Pen in 01 Black

Under the black eyeliner I applied the Essence Effect Eyeliner Pencil in Steel Smurf (intense aqua blue)

The mascara used is the Jordana Best Lash Extreme Mascara in Black


I think this look is quite appropriate for the weekend, a regular day (assuming you don't work anywhere very formal), and even a Hallowe'en girly look (maybe even Easter!).


Sunday, October 26, 2014

Essence Long Lasting Lipsticks (Review & Swatches)


The Essence Long Lasting Lipsticks are something I initially tried out this past summer and now every time I see a display, I know I've got to pick up a new color. I am featuring the shades Dare To Be Nude, Natural Beauty and Wear Berries (pictured bottom to top on the photo above).

These lipsticks are comfortable to wear, moisturizing in a pinch, and easy to apply for a very flattering look no matter which color you choose. It's not a stretch for me to say that these are my most-used and most-loved lipsticks especially since they're kind of a no-brainer to apply (you don't need to use a balm or exfoliate your lips before, or even wear a liner). I find that the darker colors even have staining properties and fade off very nicely throughout the day if I don't re-touch.

The best part is that these lipsticks are very affordable, retailing for only $2.99 each.

Essence Long Lasting Lipstick in Dare To Be Nude
The Dare to Be Nude shade is a neutral nude shade which doesn't lean cool or warm. I really like the creamy smooth application of this lipstick as I've had other nudes which apply much more patchy and I just can't seem to convince myself to wear them. After having worn this lipstick on multiple occasions, this is my go-to nude and this is coming from a girl that really tends to be scared of them.


I've inserted a photo of a lip swatch from the other day so you can see what Dare To Be Nude looks like on my lips. I found it to be very creamy and comfortable to wear and it lasted 6 hours through eating and drinking.

Essence Long Lasting Lipstick in Natural Beauty
 The first shade I picked up from this range is Natural Beauty and I think this is the perfect every day shade, especially for more fair-skinned girls, it gives me a "my lips but better" appearance. It's a medium blue-toned peachy red. I am really a huge fan of this shade, and if you don't pick any other color up from this product line, I highly recommend that you get this one. The consistency is buttery, the lasting power is great and I'm highly addicted to this shade, so much so that it is always in my purse!

Essence Long Lasting Lipstick in Wear Berries
The shade Wear Berries is a little more bold and perfect for the fall - I always lean more towards mauves/plums/berries and terracotta shades for the fall. Wear Berries is a light fuchsia violet shade, equally as comfortable to wear as the previous colors. 


Here's a lip swatch of me wearing Wear Berries recently and you can see how beautifully it reflects light and applies smoothly, looking almost like a second-skin rather than a layer of makeup. 

Swatches of Essence Long Lasting Lipsticks
Here are swatches of all of the shades in Natural and Ambient Light, the coverage is fully opaque with just one swipe and becomes even more intense in color with further swipes.

Colors of Essence Long Lasting Lipsticks
Here are all of the colors offered by Essence in the Long Lasting Lipstick product line. In Canada, you can purchase these at Shoppers Drug Mart in the dedicated Essence display. In the US, you can purchase these from ULTA.

Friday, October 24, 2014

Urban Decay Naked Vault for Holiday 2014 (Limited Edition, Online only)

Urban Decay Naked Vault

Urban Decay just announced on its blog that the Urban Decay Naked Vault will launch on their website on October 30th, 2014 for a limited time (presumably until stock runs out) for the US release. This set will be released in the UK at Selfridges on November 1st. The Urban Decay Naked Vault will retail for $280

But you're probably wondering what all of the goodies in the Vault are, it includes 12 products from the Urban Decay Naked line-up.

  • UD Naked 1 Palette
  • UD Naked 2 Palette
  • UD Naked 3 Palette
  • 3 matching 24/7 Glide-On Double Ended Eye Pencils (including colors: Zero/Whiskey, Perversion/Pistol, Black Heart/Darkside)
  • UD Naked Flushed Cheek Palette
  • UD Native Naked Flushed Cheek Palette
  • UD Streak Naked Flushed Cheek Palette
  • 3 UD Nourishin Lipgloses (including colors: Nooner, Rule34, and Streak)


I'm not really sure why Urban Decay decided to include the Naked Flushed Palettes over the Naked Basics palettes, but I have heard many complaints on forums from UD fans not being pleased about this since the Naked Flushed Palettes are meant to be for different skin-tones. It doesn't make sense that one person, who isn't a makeup artist, would want all 3, does it? 

I haven't heard any rave reviews about the Urban Decay Naked Lipglosses, so I think this is one of their least popular items - the inclusion of the Revolution Lipsticks would have made this set far more valuable, in my opinion. This set doesn't seem as lust-worthy as the Urban Decay Pencil Vault from last year or the Mother Lode Eyeshadow Vault which included every shade in their permanent range (oh my god that one was glorious)!

Will you be purchasing this set and do you think it's worth $280?

Sonia Kashuk 15th Anniversary Brush Set (only at Target) - Review & Photos


Sonia Kashuk 15th Anniversary Sets are on sale now at Target, for approximately 40-50% off, depending on the location. I picked up the Sonia Kashuk 15th Anniversary Brush Set and this is my first impression of the product as well as a review of how these brushes perform after having used them for about a week. This set normally retails for $39.99 but I picked mine up for $27 during the clearance sale.


The brush set comes with 15 brushes and features a wide array of brushes, I can't even think of any others which you may need to complete your beauty routine, this is an all-inclusive set. The purple bristles, golden ferrules, aubergine weighted handles, and golden cap bottoms make them look very elegant and high end.


Let's start by reviewing everybody's favorites: the eye brushes. From right to left, the set contains: a large blending brush, a medium crease blending brush, a small crease brush and a flat eyeshadow brush. The flat eyeshadow brush is ideal for packing color onto the lid. The medium crease blending brush is great for applying a crease transition shade and the small crease brush is wonderful for targeted application of a crease shade.The large blending brush is for feathering out your shadows after application to achieve a seamless look. All of these brushes perform as well as any higher end brushes I own.


You also receive, from left to right, an eyebrow spoolie, a flat lipliner/eyebrow/small shadow brush, an angled liner/eyebrow brush, and a pointed shadow liner brush. I like to use the flat lipliner/eyebrow/small shadow brush (not its technical name) to apply powder to my eyebrows, and the angled brush is ideal for applying gel eyeliner. The pointed shadow liner brush is great for getting color just under the lower lashline, this has been my primary use for it. 


These are two very conventional brushes, one is a larger powder brush and the other is a blush brush, I use them as the names suggest and am very pleased with the results. The blush brush is the ideal size to cover the apples of my cheeks and up to my temples.


The dense brushes in this set are a an angled foundation/powder brush and a buffing brush. I use the angled brush to apply my foundation, but it does not provide the smoothest of finishes, so I go back over my liquid foundation with the buffing brush to make it seamlessly blend into my skin. Both of these brushes also perform very well with powders.


This contour brush is worth the purchase of this whole set, it is a dupe of the NARS Ita brush (which is a single brush that costs $55!) - I can tell you that it is varied from it in the sense that it is more densely packed, has a larger thickness and has slightly shorter bristles. I use this brush to deepen my contour after using a larger brush to apply a contour transition shade.


These are the liquid/cream brushes which are best used as a foundation brush and small concealer brush. I like using these with thick products because they provide a very precise application while not letting product drip all over my face. Ideally I find that these apply concealer well under my eyes and on spots. 


Overall, I think this purchase is a great buy, the brushes don't bleed when you wash them although I do suspect that they will start to fade a little bit after multiple washes. There is also no hair fall-out from these brushes, they are dense and stay that way through continued usage - so they are nice quality overall, especially for their value (they were less than $2 each for what I paid!).
Related Posts Plugin for WordPress, Blogger...