Monday, October 14, 2013

DIY Beauty Hacks All Girls Should Know

1. Use a light-colored frost eye shadow to create luscious 3D lips. Or use a different eyeshadow color for more depth and an ombre effect.

Use pale frosted eyeshadow to get fuller, 3D lips.

2. Use Elmer's Glue to remove blackheads just like the Pore Strips only much cheaper. Use it only on your nose or on your entire face (avoid your eyes, nostrils and mouth). Apply gauze before the glue is dry for easier removal of the glue, otherwise just peel or rub it off.

http://midwestmodernmomma.com/no-more-expensive-pore-strips-for-me/

3. Use Elmer's Glue as a nail polish base for easy to remove glitter manicures. All you have to do is peel from the side! This manicure can last up to 2 weeks.

Want to wear glitter nail polish without going through the pain-in-the-ass removal process?

4. Apply one coat of Elmer's Glue on your cuticles and around your nail and let it dry, then apply your nail polish. Remove the glue by peeling it off and it will give you the perfect manicure.

26 DIY Beauty Hacks (no mess nail polish with glue...)

5. Twist your hair into two pieces and then twist them around each other. Hold the ends down and run a flat iron over them slowly up and down in the direction of the swirls. The end result will be soft waves.

263230_490910857644441_421509142_n

6. Basics of eyeshadow application: 1 and 2 should be your lightest color. 4 should be your next lightest tone applied to the eyelid, 3 should be a darker mid-tone shade which goes into the crease. 5 should be the darkest color, applied in an outer v-shape to define the shape of your eye.


7. Use a light shade of shimmer eyeshadow in the inner corner of your eyes for a refreshed and bright appearance.

27 DIY Beauty Hacks Every Girl Should Know

8. Use a rubber band to fix your french manicure.

Use a Rubber Band to Fix Your French Manicure - 40 DIY Beauty Hacks That Are Borderline Genius
http://paperraindrops.blogspot.com/2012/02/french-manicure-cheat.html

9. Know where to apply perfume so it lasts all day:

Know where to apply your perfume so it lasts all day.

10.  Make your own perfect, custom BB cream.

http://beautyvancouver.com/2013/07/02/d-i-y-bb-cream/
11.  The perfect eyeshadow colors for your eye color.


12. Turn any eyeliner into a gel eyeliner. This also works for turning lip pencils into lip gloss.

Turn any eyeliner pencil into super-intense gel liner.

13. Use white eyeliner or base all over your eyelids to make any eyeshadow color pop with brightness. Use black eyeliner or base all over to make colors more intense and smokey.


14. To cover up dark circles, apply concealer in a triangle under your eyes. Orange shades of concealer will combat blue undertones of dark circles.

Cover up dark circles by applying concealer in a triangle shape.

15. Apply concealer, paint pots, eyeshadow base, or Maybelline's Color Tattoo cream eyeshadows as a base under your powder eyeshadow to achieve a more professional look and more staying power.


16. Want plumper lips? Add Peppermint essential oil to your favorite lip gloss to get those bee-stung lips without having to pay a high price!

Instead of shelling out for Lip Venom, add a drop of peppermint oil to your favorite lip gloss.

17.  To make your lipstick last all day, remember to "set" it by blotting off excess product with a napkin and then dusting translucent powder over your lips with a large fluffy brush.


18. Make your eyelashes longer and more full with baby powder. Use a clean mascara spoolie to grab some baby powder, shake off the excess and then comb it through your lashes. Apply your mascara and your lashes will appear thicker and longer!


19. Do you need to tame your eyebrows? Use a clean mascara spoolie (can be from an old mascara you used up) and dab it into petroleum jelly or aloe vera gel. Then run it through your eyebrows for a clean, tamed look that will last all day.


20. To make your red lipstick last all day and to avoid bleeding, line your lips with a matching color of lip liner. To achieve the most natural look, rub the lip liner all over your lips rather than just around the edges.


21. To get the perfect ballerina bun, use a bun filler from any store or make one of our a sock that you cut the toes off of. Roll the sock around itself to create a donut.


22. To get rid of split ends twist your hair around itself and cut off the pieces that are sticking out.
http://www.diyncrafts.com/3312/fashion/40-diy-beauty-hacks-borderline-genius/12

23. Out of dry shampoo? No problem, make your own with this simple recipe.

http://bridebird.com/how-to-create-your-own-dry-shampoo/

24. Turn Kool-Aid into a lipstain.


25. Contour your face to add dimension and thin out your features by using this simple guide.

highlight and contour guide blog
http://blog.spaboutique.ca/tag/jane-iredale/

26. Creating the perfect cat-eye with eye liner.

http://www.pinterest.com/pin/116178865360397704/

27. Make your own lip scrub/exfoliator.

http://theberry.com/2012/10/11/just-a-few-beauty-tips-6-photos/beaty-tips-1/

28. How to do an easy flawless french manicure with paper hole protectors.

http://www.popcosmo.com/2012/05/04/how-to-do-a-french-manicure-effortlessly/

29. Achieve a polka dot manicure using a band aid.

Easiest nail art EVER.
http://thebeautythesis.com/2012/11/13/polka-dot-nails-using-a-band-aid-why-didnt-i-think-of-this/

30. Check your makeup in the sunlight. The daylight will expose any mistakes you may have made in an unnaturally lit room.


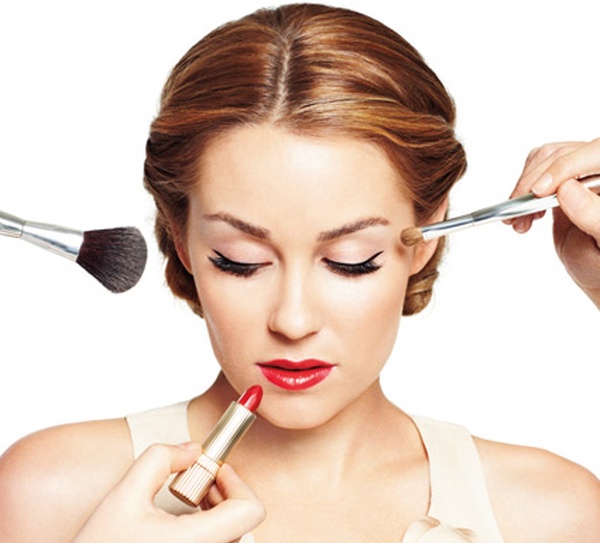
31. When applying eyeshadow use at least 3 brushes to keep your look from becoming one-tone and muddy.
http://blush-berry.blogspot.com/2008/09/basic-makeup-set.html
32. Use visine to tone down the redness of pimples.

Wikihow

Sunday, October 13, 2013

Product Review: Wild Carrot Herbals Wild Rose Eye Cream

Wild Carrot Herbals is a small, family owned company from Enterprise, Oregon. I'd never heard of this brand until I went to the Pearl District Whole Foods in Portland while on our trip.

I was looking for an "affordable" yet organic eye cream to wear at night - since I have all my other creams in storage, I really needed something to tide me over.

The packaging really drew my eye, it looked wholesome, organic, like a little drum full of vitality. It also had the smell of roses, which reminds me of my grandmother since many cosmetics from Europe back in the day featured the essence of Rose. This was only $9.99 for 0.5 fl oz so I figured I'd give it a shot. I know I could buy cheaper creams from Target but they were full of chemicals, and I really did want to give organic a shot. I appreciate that the expiry date (which is about a year in the future from when I purchased it) is labeled on the outside of the drum and on the outside of the product for maximum visibility. It's super important not to smother your skin in creams that are expired, that way you could actually be doing more harm than good to your skin.

EyeSo did this product actually work? Yes, yes, emphatically yes. My eyes feel smooth, soft and some of the fine lines and wrinkles are not as apparent when I wake up in the morning after applying this at night. That being said, I am a 26 year old and I do notice some fine lines appearing and they are exacerbated by dry, cold weather. This cream really limits and even reverses the damage done to my skin, it leaves my eyes feeling soft, rested, and my makeup looks much more flattering on smooth lids rather than flaky, dry ones. As you can see in the photo, the formula is smooth, creamy, and the smell of roses is pleasant and not overwhelming. The cream easily blend into the skin and doesn't leave your skin feeling greasy, it also glides on very easily so you don't have to tug at your eye area. There was absolutely no irritation and a very small amount goes a long way. After using this cream for 2 weeks, I can say I've barely made a dent in how much there is. So although the bottle may appear small, it's definitely deceiving since you use such a tiny amount!
A Bunch of Roses Kit

I went on a beauty hunt through the Wild Carrot website and I found this beautiful set called "A Bunch of Roses" which features the Wild Rose Eye Cream, grapefruit rose lip balm (oh my lord, I love grapefruits, too!) and unrepentant rose soap. I'm going to gift myself this set when my wild rose eye cream runs out! I think this would make a beautiful present for any special lady in your life.

Next I'm interested in trying the Luminous Lemon and Lavender Eye Brightening Cream since I know that Lemon has natural bleaching properties, this sounds like a product I could easily get behind.

You can purchase any of these items on the Wild Carrot Herbals website or on eBay.

Thursday, October 10, 2013

How to Get the Barbie High Ponytail

I've always wanted to get my hair to look voluminous and have a high ponytail but it never seemed to work out and my hair would always flop down into a sad, droopy donkey's tail. There's a quick and easy way to achieve that dramatic volume without much work at all! All you're going to need for this very simple tutorial is two no-damage elastics of your choice (I prefer to use ones that won't tug my hair out when it's time to take them out) but you may want to choose ones which are close to your hair color. You're also going to need a teasing comb, or if you don't have a comb, a brush will work fine as well, you just will not be able to back comb your hair for extra volume.
Here are the steps to achieving a Barbie-rrific glamorous look!

1. Section the front "crown" of your hair away from your face and tie it down into a messy bun
2. Take the back section of your hair and comb it out, add curls for extra volume and backcomb it for even more volume.
3. Tie the back section of your hair into a high ponytail with your first no-damage elastic hair band (the higher, the more it will look like Barbie's!)


4. Comb the front section of your hair down, have it frame your face however you would like or you can just pull it back tightly
5. Smooth it out and wrap it around your pony tail to create a large bun OR if you're not looking for a bun-pony you can just pull it tightly around your existing ponytail and tie down the second "shell" of hair around your first pony.
6. Tie down your outer pony on top of your inner pony, the extra elastic will add some volume but it will also let you achieve a more precise high pony if you're only focusing on smoothing out the front rather than also worrying about where you're tying it down.


Then you will have a beautiful high ponytail. The most flattering placement of the pony is directly in line with your cheekbones, upwards from the hollow underneath them. This is the easiest way to achieve a high pony because you don't have to worry about your fly-aways as you're trying to tie it down, basically the "inner ponytail" acts as a base or guideline for your finished, polished "external ponytail". Trust me if you follow these very simple steps, they will change you ponytail routine! Happy ponying! 


Wednesday, October 9, 2013

Luvocracy: Pinterest + Shopping in One

luv

You may have heard the name fluttering about the past few months, but what is it? Luvocracy is essentially the same thing as Pinterest but far better in the sense that it lets you purchase what you want directly through clicking on a photo of the item "luv'ed". I'll admit it took me a little while to get on the bandwagon, but it's such a useful tool! I think it would be great for holiday shopping and really has the added functionally (but not yet the population) lacking in Pinterest.
Now an interesting thing that I noticed is when I was looking through the website but did not have an account it was only showing me beauty posts from on poster (Ingrid Nielson aka MissGlamorazzi on YouTube) but then once I signed up for an account, it showed me plenty of other users, so I suppose they're just not sharing other user's login names unless you are also a user, which makes sense for privacy reasons. 

My only qualm with this is that at first, the site seems barren so some people might be reluctant to sign up since they do not see a variety of posts from multiple users. However, let me reassure you that once you sign up, other posts become available! I was so relieved to see that the website is indeed populated with like-minded individuals that I can share my love of makeup, fashion and home decor with!

On Luvocracy, it's retailers and users who benefit from the shopping setup. It's simple, rewards come in the form of money off pending purchases or royalty checks. You can earn rewards when you refer friends or when they make purchases, you earn 2% of all referral purchases but this only lasts for your 1st year of membership. However, if someone buys something you recommended by pinning it yourself, you earn 2% of those purchases and this is permanent. But for every degree removed you are from the person who generates the sale, your royalty is halved. So if I refer something and someone else refers it after me and then it is purchased from that person, I will make 1% rather than 2%.

So these added perks are something to consider because you can essentially be pinning items while you're at work, on-the-go, or as a full-time job. Luvocracy really takes out the middle man which most affiliate programs make you deal with and increases the transparency of how you make money and what amount of money it will be.

The best part is you can even download a simple button for your browser and as you're looking through things you may like, just click it at add it to our collections! You even start out with a $10.00 shopping credit!

You can find my profile here: http://www.luvocracy.com/lethalglam


Tuesday, October 8, 2013

DIY: Chrysanthemum Starburst Mirror

Photo Courtesy of Little Things Bring Smiles

Want to know the secret to making these beautiful mirrors? It's much simpler than you may think: plastic spoons. That's right, you need very few materials in this simple at-home DIY. Make sure you get all of your materials as cheap as possible, the purpose of this DIY is to save you money on a priceless piece of wall art that will be unique to your space.

You will need:


Here are the steps you should follow to achieve this beautiful wall decor: 

Trace around your mirror onto your foam core or thick cardboard

Use your homemade compass (string tied to your pencil to draw the diameter and hold down the inside portion of the string with your finger) and measure out an inch (this will be for one row of spoons)

Depending on how many rows you want to make, go that many extra inches and draw the diameter of the circle with your pencil compass on every inch as a guide

Cut your foam core or thick cardboard around the outermost circle you have drawn

Cut out the center-most circle as this will be where you will glue your mirror on from the reverse side (if you are going for a recessed look). Skip this step if you plan on gluing your mirror to the front of the piece so that it lays atop the petals

Cut your spoons up, removing the handle from the base of the spoon

Start hot gluing the base of the spoons upwards (so that they stand out three dimensionally like flower petals)

Work in sections, start around the outside of your design and leave about an inch between each petal

On the 2nd layer, make sure you place your petals in the gaps you left on your first layer

Keep moving inwards in layers until you have reached the center on approximately half of your decor piece. Complete the other side of your piece.

If you chose to color your flower, then spray paint your petals in a well ventilated area and make sure to get the backs of the spoons as well so that they don't look dual toned from the sides (unless you're trying to achieve this effect). If you want to achieve a dual-toned effect or multi-colored effect you're going to have to paint your spoons and let them dry before gluing them down.

Apply a second coat of spray paint to the petals for a more full coverage finish (glossy or paint is also an option). Allow your petals to dry elevated.

Hot glue your mirror either to the front or the back of your piece (depending on if you want it to look recessed or like it's coming out of the flower) but make sure to only use the hot glue around the edges and that it does not become messy - you are gluing to the foam core or thick cardboard

Apply the mirror hanging kit to the back of your piece, this is really easy with foam core because you can just push nails into it if you don't have a wall-hanging kit and it will just stand on your wall


You can even try this project with a photo frame or clock!


What else can you make out of plastic spoons?


Remember, you can always go the easy route and avoid purchasing spray paint and the mess of painting altogether and get colored spoons! And don't force yourself to stop at just one color... you can design a rainbow! You can buy huge quantities of spoons in bulk for very cheap prices, so play to your heart's delight.


Related Posts Plugin for WordPress, Blogger...