Tuesday, November 22, 2011

Q-Tips: a double-edged fuzzy sword of eardrum doom

Q-tips are useful for so many things: cleaning in between your keyboard keys, touching up your eyeliner, cleaning excess nail polish off your fingers, and for most of us, and most importantly, cleaning inside our ears. If this sounds about right to you, you should be alarmed. Here's a little Q-tip history for everyone, in 1926, these 'Quality-tips' were named 'Baby Gays' according to their website. Obviously, as time went on, people realized what a ridiculous name that was and changed it to just 'Q-tips'. Imagine what a marketing nightmare it would have been to leave the original name in our present-day society. Would cotton swabs, by any other name, have been as popular? Apparently not, because we use the name-brand as the genericized trademark for an entire category of cotton swabs now.


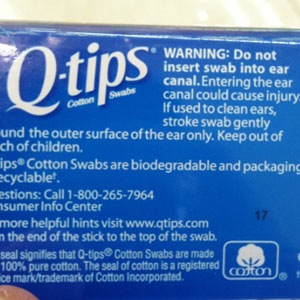
Did you know that Q-tips were never intended to be used inside the ear? Many ear, nose and throat doctors (also known as otolaryngologists) are furious at their patients because the majority of people do use Q-tips inside the ear as unintended. There is a big warning label on every package of cotton swabs that says not to insert the tip into your ear. If you must use it on your ears, only use it on your outer ear, or the external cartilage. Why is it that we've never been told this by our parents or grandparents? That's because, apparently, we've been doing this wrong for almost a century and what's worse is that we have been passing on this terrible habit to our offspring. We use it to get all that yellow gunk, also known as earwax, out of our ears and to get water out after we shower, and we tell ourselves it's so that we don't become ill when we go outside in the cold after a hot shower. This solution is doing us more harm than good. If you want to use something to clean out your ear, use the corner of a washcloth or your towel.

You may be asking yourself what all the fuss is about, what's the harm in using these little cotton buds in your ear? Well, the problem arises when you blindly start to push it into your ear, and we all do this because we can't see what's going on inside our ear canal. Oftentimes, people rupture their eardrum by pushing the swab inside too deeply. Our earwax is an important part of our physiology because it is the protection provided for our inner ear to keep water out and keep bacterial infections at bay. Removing all of our earwax can prove very detrimental to our health in the long-run. When using cotton swabs, you are actually technically pushing much of the wax deeper into your ear canal, helping to create a painful plug. If you find that your ears are itchy and you need to relieve yourself by pushing something in there, try and control yourself and abstain from doing so because the more you scratch, the more you will itch and eventually just break the skin.

So keep your Q-tips around for cleaning your computer, video game cartridges, fans, or anything other than your poor ears. If you find that you have an ear blockage that is bothering you, gently pour warm water into your ear slowly but constantly with something like a Nettie pot and this will soften up the wax and allow it to slosh out. If you want to dry out your ears, use a towel or your hair dryer and hold it a safe distance away (your ear should not become overbearingly hot).


Monday, November 21, 2011

Screen printing our own shirts!

Screen for flat one-color shirts
I happened to be in the Superfad office in Seattle on Saturday and, to my surprise, one of my friends and an employee of Superfad, was there getting ready to screen print the company t-shirts. I found the idea utterly phenomenal because how amazing is it to make your own shirts? Armed with his amazing design, 60 blank shirts, the printed screens and buckets of paint, we began. I had no idea what the foundations of screen printing even were, but I trusted Sean because he said "it's easy" in a completely non-chalant way, as if he'd done it a million times before (he hadn't). I was just eager to help because it's just about the most awesome thing I can think of to make your own shirts. It combines very technical and precise principles of how-to with the fun and creativity involved in making the design and choosing the colors.


A. ink. B. squeegee. C. image. D. photo-emulsion.
E. screen. F. printed image.
The basic principles of screen printing are as follows: you push the squeegee across the screen and it draws your chosen color of ink over the photo-emulsion (housed inside the screen) and a printed image is transferred onto your shirt. That means if your shirt has multiple colors in different places on the shirt, you have to use multiple screens. We used as many as four, which is overwhelming because the base of the screen-printing machine has to be rotated each time and the registration (or calibration) of the position must be precise. The machine used to screen-print is extremely primitive and only consists of nuts, bolts and knobs that can be tightened to stay in place. Needless to say, it took hours just to get the screens in the right place but the good news is that once it is done, you can mass-produce shirts in that one pattern. So much problem-solving is involved in the entire production of shirts that it really is a wise idea to send away for your shirts to be screen-printed professionally because those companies will have a team of specialized individuals doing this. That being said, you will miss out on the opportunity to gain the fulfillment that we will get that everyone at the company's going to be wearing shirts we made!
The pile of 60 American Apparel blank shirts in all different sizes that we had to begin with

Colors for 4-shades of green/blue shirts
Before we could print, we had to spend time doing labor-intensive color-mixing, we began with flat one-colored shirts in black, white, and cyan. The colors are very specific and we had to match a pre-approved template mock-up off the computer and let me tell you, it is much more difficult to get colors to match than you would think without causing waste or making too little of each. We were also starting out from just base colors of green, blue, yellow, white, black and red (the latter color gave us tons of problems because it was old and cakey and would clog up our screen).

The maestro perfecting the process
Then when we finished these shirts, we dove straight into the most complex design: the 3D shirt. This design was by far the hardest for us to accomplish because the red paint was tripping us up to the point where we had to clean the red-screen each time we did a shirt on both sides with a screen opener solution. Then we had to be careful that the screen was completely dry each time so that it did not smear the shirts. The placement of the colors in this design is absolutely crucial because the red and blue dye slightly overlap and this overlap is made up of a dark grayish tone, to simulate a faux 3D effect. After each color pass, it is vital to 'cook' the shirt or place it under an industrial heater for a few seconds (but not too much because it would burn the shirt) to let the color set before going onto the next one so you do not create a mess on the under-side of each screen. This hiccup would then be transferred on each subsequent shirt, rendering it messy and useless.

Completed 3D design Superfad shirt
Completed four-shade design in green

The next day, we braved another tough design, this one included four-shades of cyan or green, creating two different tones of the pattern. By now, we had become pros, a well-oiled machine making beautiful and memorable t-shirts. I'm extremely happy with the way they all turned out, and with t-shirts we found lying around in a box around the office from previous passes at t-shirt making, we created so many different options of shirts that nobody in the office will be dressed the same. These shirts have a real authenticity to them, you can feel the logo and it makes a lasting impression like beautiful graffiti designed by one of my favorite artists. I had so much fun doing this, I think if you have the opportunity to do it, everyone should experience it at least once, so you know what you're paying for every time you buy a screen-printed t-shirt.
Piles of varied styles when we finished

Piles of one-color t-shirts

Sunday, November 20, 2011

The pros and cons of teeth whitening kits

For those of us who have somewhat yellowish or off-color teeth, teeth whitening kits might be a consideration. It is a simple option, available at any nearby Wal-Mart or drug store that doesn't require a whole lot of patience or visiting your dentist. Many times, the effects of the options readily available to us are quite astounding and help to brighten our smiles and overall presence in a room.

Kits that you can use in your home will work for changing your smile anywhere from three to eleven shades of color. Whether it be in gel form, whitening trays, toothpaste or strips, each of these works in a very similar way and is much less invasive than what your dentist can do with laser teeth whitening procedures (and far less costly).  However, like anything else you're using, you have to think about whether or not you should, if there are more pros and cons out of it for you, or you could do some serious harm to your smile.

A simple solution is tooth whitening paste because it requires very little effort, it's really just about brushing your teeth as you do as always, merely replacing your current toothpaste with whitening toothpaste such as Crest 3D White. The price-point is just right, costing just a little bit more than regular toothpaste (by about a dollar or two), and there is no associated pain or adverse effects. If you have severe discoloration, you won't see much improvement, if any, from these toothpastes, but they have been proven not to affect the health of your enamel, so you don't risk anything from trying it out.


No matter what you are doing, if you're using a medicated or chemical agent, you should always follow the instruction precisely. Have a timer with you when you are whitening your teeth and make sure you do not leave the strips or trays on longer than the instructions say to or you can ruin the enamel coating that protects your teeth naturally. Some people can experience tooth sensitivity where anything that touches their teeth causes extreme pain and awful sensation. Obviously, if you have used teeth whitening methods and this happens, stop immediately and visit your dentist or use Sensodyne toothpaste. You should not be using tooth whitening kits if you have receding gums, sensitive teeth and gums in general, or are allergic to peroxide (active ingredient in tooth whitening kits), but you should discuss it with your dentist before you go ahead and attempt doing so on your own. It is also important to note what kind of teeth you have because brownish-tinted and grayish-tinted teeth do not bleach well and if you have obvious fillings, bleaching will do nothing for their color but make them stand out even more in comparison to the rest of your newly-whitened teeth.

An easy way to make sure your teeth are white is to follow a proper diet heavily infused with fruits, vegetables, and drinking plenty of water. If you drink red wine, pop, caffeinated drinks, or colored drinks, you will diminish the whitening result fairly quickly. It almost goes without writing that if you smoke cigarettes, you should quit for a myriad of reasons, one of them being that they stain your teeth permanently and whitening kits won't do anything for you.

You may have other, associated issues causing your teeth to change color, for example, if you suffer from Bruxism (tooth grinding) you will wear away the bottoms of your teeth and inside the chipped areas  you will see yellowness. You should go see your dentist if this is the case for you so that they will provide you with a custom mouth-guard to be worn at nighttime when you cannot control your jaw's motions.

Saturday, November 19, 2011

Bacne: Back+Acne Treatments

Whether you're an athlete, a teenager, or just like everyone else, you may be afflicted with acne or pimples on your back. It is classified as zits that come up on your back, chest and shoulders inclusively. There are some mechanical ways to make sure that you don't breakout or contain your current breakouts. If you notice that you are starting to get some, you may want to wear loose clothing which is newly cleaned because you want only soft cotton fibers on your skin as they will remove excess sweat and skin flakes. If you're a girl and you wear a bra, try to wear a new one every day for this same hygienic reason. Your straps should fit well and not chafe against your skin throughout the day, but if you find that you get breakouts regardless, then try to switch to a strapless bra. Sometimes your acne can be an allergic reaction to your laundry detergent or the fabrics you are wearing, so try to eliminate any possible allergens. Bacne is formed when your pores get clogged by when excess sebum formed by your sebaceous glands and dead skin cells attracts bacteria. The reason why your back is so prone to acne is that there are more sebaceous glands here than most other places on your body.

Washing regularly
First and foremost, this should go without saying but it is definitely worth reiterating: if you want to get rid of your bacne, you must wash every day. Using anti-bacterial soap during your daily (and even twice daily if you have the time) wash will help eliminate the bacteria in your pores. Don't over-scrub or over-wash the area because you can irritate your skin and cause it to become too dry. If your skin is too dry it will go into panic-mode and release too much sebum to cover itself up, leading to more acne. You want to maintain a balance of moisture on your skin. Gently use an exfoliating sponge, loofah or washcloth during your shower (yes, you want to shower unless you are having a salt-water bath because soaking your skin in a pool of still water can increase your chances of getting more bacteria in your pores). Because the skin on your back is generally a lot tougher than the skin on your face, you can exfoliate gently every day and not just once a week, it is safe to do so as long as you're not worsening your irritation. Make sure that you wash your body with a medicated body wash that has two percent salicylic acid or benzoyl peroxide, specifically letting it sit over the area which has pimples before you rinse it off.

If you can get near a beach - alternative treatment
The simplest method to get rid of your breakouts is to visit the beach. Having your skin submerged in sea salt water for approximately ten minutes can drastically help your skin. No cream or cleanser will help your skin the way the ocean can because it has natural anti-bacterial properties. The warm temperature of the water helps to cleanse the skin. Sand also can act as an exfoliating agent and improve your complexion if you gently rub it on your afflicted area. If you can't get near a beach, then you can achieve the same effect by boiling a mixture of salt and water and letting it sit to the side until it has cooled. Use this solution to wash your face and body to get rid of dirt and oil.

Infuse moisture
Use a moisturizer after you wash your skin to increase the hydration level of your pores. However, make sure that the product you use is oil-free and medicated if your acne is severe. If you are already using a medicated soap or treatment, then use just a regular moisturizer without medication in it that is highly hydrating and is noncomedogenic, which means that it does not block pores, because this will reduce the incidence of pimples and will not allow the salicylic acid or benzoyl peroxide (pimple treatments) in your other products dry out your skin.

Medicated treatments
If you use medicated creams or gels, try to go for ones that say they contain benzoyl peroxide or salicylic acid but do not use both. If you use both of these substances together on your skin they can have negative effects on your skin and may burn your skin pretty severely. The burns from these products can be worse on sensitive skin than any acne, so you may want to consult with your dermatologist if you have a history of negative skin reactions. It is important that you use a hydrating cream over top of these treatments or after you clean them off because your skin will be dried out. These treatments are also bleaching, so make sure you don't put your clothing right over top immediately because you won't be able to repair the color.

The rule-of-thumb is that if you're using one product that is medicated, whether it be soap, treatment or moisturizer, you want them to either be from the same line of products or stick to just one of them so that there are no negative interactions between the chemicals used. You don't want to overload your skin with chemicals, it may have an adverse reaction to this. Rather than experimenting on your skin with harsher treatments if you don't know how your skin might react, I suggest going to visit your dermatologist. Some problems are too severe to take care of with over-the-counter treatments and regular body washes. Some treatments may take weeks to work and others may have no effect at all on you so you may want to seek help especially if you have deep, painful cysts on your back. If you have a serious affliction or problem, you may need an aggressive topical treatment or antibiotics, to avoid scarring and for the best possible results visit your dermatologist.

How to apply false eyelashes

Before adding fake lashes
Looking to spruce up your eyes and make your eyeshadow application pop? Well, this is a great solution for daytime or nighttime, just make sure you don't choose lashes that are too dramatic. A good way to tone down any pair of lashes you buy is to cut them in half and only apply one half of the lashes to the outer corner of your eyes. This will drastically reduce strain on your eyes and make them very wearable, and you don't risk looking like a clown (it also reduces your cost because you can turn each eyelash set into two separate sets).


One false eyelash cut in half can be worn on both eyes
First, do your eye makeup application in full, including your eyeliners, a cats eye look is great with false lashes because the winged tip of the eye liner masks the seam of the false lashes. Make sure your hands are washed and disinfected thoroughly before you attempt to place false eyelashes on because you don't want to get any nasty bacterial infection or allergic reaction. 

Then, you want to use a medical-grade lash adhesive such a Duo, I personally prefer the white formula which dries clear because it masks any mistakes you may accidentally make. Place a small dollop on the back of your hand after your thorough cleaning. Then, working relatively quickly before the glue dries (but don't worry, you have a good minute or more), run the backing of the eyelashes through the glue and let them sit for 15-30 seconds while the glue becomes tacky. 

Fake lash application
When placing the lashes, try to get them as close to your natural lash line as possible but do not, under any circumstance, place them over top of your actual lashes. Getting the glue in your eye can be painful and you want to avoid this. If you have a thicker eyeliner application, it makes putting your lashes on much easier because there will not be any skin-colored gaps between your lashes and the fake ones. If you are using a full-sized fake eyelash, you want to begin placing it down from the inner corner of your eye, and then tack on the outer corner, pressing down on the middle only after you have secured the ends. But if you are using my method of cutting your fake eyelashes down, then you will want to start at the outer corner and tack the end on where you feel it will look nicest (probably where your liner starts to wing out).

You can see from the finished picture that using only half of the eyelashes and turning them inside out (so that the shortest hairs go over top of your lid and the longer ones go to the outer portion of the eye) makes for a subtle, beautiful and feminine look. They look like an extension of your own eyelashes. You can finish off the look by adding black mascara to combine your own eyelashes with the fake ones for even more of a seamless look.

Completed half-lash application


Friday, November 18, 2011

Water-Marbled Nails

Finished design from this tutorial
Do you want to achieve salon-grade manicures at home with interesting designs but you're not very artistic? Well, I have the solution for you. Don't bother spending your money on magnetic nail polishes or nail polish strips, you can learn to do this right at home without having to go out and purchase anything.


Tools for this project
What you'll need:
  • Q-tips
  • Toothpicks
  • Nail polish colors (at least 2, must not be fast-drying)
  • Top-coat (can be fast-drying)
  • Nail polish remover 
  • Nails (real or fake will do)
  • Tape (any kind really)
  • A disposable cup
  • Room temperature water
  • Paper towels

You will want to prep your nails before you do anything else and make sure they are well cleaned, and apply a coat of nude colored nail polish so that the variation in color in your own nails does not affect the water-design and show through. Then you will want to set up your work space by placing down a paper towel to cover the table you're working on so you don't get it all dirty. Fill your disposable cup about three quarters of the way up with room temperature water (you can use filtered or tap water, some people say filtered water is better because there will be less bubbles in it). It is important that you use room temperature water because hot water will cause the polish to spread too fast and cold water won't let it spread enough. Place tape around your nail and on your fingertips so that you don't get your fingers all messy and have to go back with tons of acetone to clean them off. This step is a definite time-saver, although it may not seem so at the beginning.

Open your nail polishes up because time is of the essence when you are doing this, this doesn't mean rush, be meticulous but quick. Carefully place a drop of nail polish in the water and then place the next color inside the middle of the previous color. Do this over and over until you have your desired bulls-eye of colors.

Then use your toothpick to swirl the polish or drag it in and out to create a pattern. My personal favorite is starting from the second line and dragging it into the middle, but make sure you do not pull up, push the toothpick into the middle so that the nail polish does not separate. Wipe your toothpick clean after each swipe with the toothpick because the colors will stay on it and affect your design in a not-so-pretty way when you place it back in.


Place your fingernail down into the water wherever you think the design looks nicest. You can even put all of your fingers in at once if you want a random-looking swirl on each finger. Do not lift your fingers out of the water immediately. You will want to leave your fingers in the water and wait about 30 seconds until you take a q-tip and clean out the excess polish in the water (around your fingers). This will clear away any potential polish like a thin skin so that it does not affect your beautifully designed nails. Then you can lift up your nails. Wait a little while for them to dry and then remove the tape from around your fingers carefully so that you do not smudge anything. Use a q-tip dabbed in nail polish remover to clean up the sides of your nails and your cuticles of any nail polish. Repeat this process with all of your nails.
Before removing the tape
After removing the tape


Apply a topcoat as the final step to stabilize your design and make it glossy and this will also help to get rid of any excess water bubbles floating on the surface of your nail. You can make all kinds of designs with this technique, I only experimented with two nails so far but I've seen some beautiful designs on Google!

How to make your own feather earrings

Since feathers are all the rage in style and accessories of all sort, including hair extensions, scarves, and jewelry, I have come up with a way for you to incorporate them easily in your jewelry making. This is a very inexpensive project for those of you who are into the bohemian chic look of recent fashion.

Supplies you'll need:

  • ear hooks for making earrings - from your local craft or bead store or online
  • craft feathers - from your local craft store or they can be bought cheap online
  • bendable wire (preferably something you can mold but that won't come apart later)
  • charms, chain or anything else you wish to attach to your feather earrings
  • flat-nosed pliers
  • wire cutters

What you first want to do is pick out the feathers that you would like to use, whether it be just one pair or multiple kinds of feathers. You can use various sizes and shapes depending on what your personal style is or what you think would look cutest. Trim the stem of the feather so that there is only a little bit left for you to wrap your wire around. After this you want to wrap your bendable wire around the top part of the feather multiple times. Form a loop on the end of it that is going to be attached to the ear hooks and make sure you cut and tuck the end into the rest of the wire and press it together so that it doesn't stick out (cut using your wire cutters and press the wire together with your flat-nosed pliers). The wire can be in any color you choose and you can trim it after you are finished.

Open the loop of the earring hook and place the loop extending from the feather inside the open loop. Here is your chance to further customize your earrings by adding any embellishments you would like to the earring hook. Then when you are finished adding baubles, close the loop of the earring hook securely with your flat nosed pliers to let your feather dangle freely.
Related Posts Plugin for WordPress, Blogger...