Showing posts with label cosmetics. Show all posts

Saturday, June 7, 2014

Product Swatches and Review: NYX Soft Matte Lip Cream


I picked up a pack of 3 soft matte lip creams about a year ago because I saw that there was a 3-pack on sale at a local Urban Outfitters. I didn't even know anything about them at the time and my expectations were very low. I used and loved my original three so much (Tokyo, Antwerp and Addis Ababa) that just last week I decided to pick up two more (Milan and Sao Paulo). 

 I wanted to take swatches of my mini-collection to give you guys an idea of the pigmentation of these (swatches were all done with one swipe) - these are highly bold, pigmented, long wearing and last well for me even through eating and drinking. I get a solid 6 hours of wear time from these before they start to disappear off my lips. They are not the most moisturizing product and can even leave your lips a bit dry but this is not a problem if you apply a tiny bit of vaseline or chapstick first.

Tokyo: Bubblegum pink
Milan: Mid-tone blue-toned pink
Antwerp: Mid tone yellow-toned pink
San Paulo: Plummy pink
Addis Ababa: Bright fuchsia

Antwerp is the most unique color of the bunch, I don't have a color like this in my lip product collection. The middle three, MIlan, Antwerp and San Paulo are my favorites. Let me know what you think about this collection and if you have any other recommendations for me to pick up!

Monday, June 2, 2014

Sneak Peek: Maybelline Fall Matte Color Tattoo Collection (2014)

Photo from Beautezine's instagram: http://www.intagme.com/beautezine/734219344452265565_8519872/
There was a sneak peek of the new line of Maybelline Color Tattoos coming out this fall and they're all matte, folks! Yep, Maybelline is doing it again by releasing these colors in a totally matte formulation. I'm super excited, the colors are very fall-esque, with what appears to be dark maroon, brown, copper, black and a plum leaning gray.

I can't wait until we have more info on these but I just wanted to give you all a quick heads up, I know I got super giddy when I found out!

Thursday, May 29, 2014

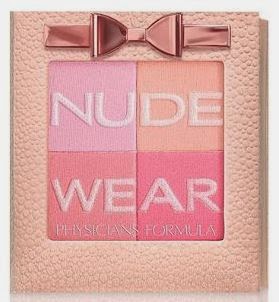
Product Review: Physicians Formula Nude Wear - Nude Glow Blush (Rose)

Promotional Photo of Nude Wear Compact

As promised, I have a review for you on the Nude Wear blush by Physicians Formula that I picked up from the Rite Aid sale yesterday. Upon first glance there was a pink over-spray on the writing which I thought would equate into having a more shimmery blush. However, this spray went away after the first swatch and there is absolutely no shimmer left on my blush now. 

This blush gives a sheer, satin finish but it is definitely build-able, specifically the lower 2 quadrants. This is like a lighter mix of NARS Orgasm and MAC's Dollymix blushes when worn. The textures are buttery and smooth and not powdery at all, I haven't noticed any fall-out or flaking on the compact itself. I picked up the "Rose" compact, but there is a "Natural" (more coral-leaning) and there is a set of Powder compacts in this same line (available in Light and Medium) which look more like bronzers than all-over-face powders. 


Here are my swatches of the "Rose" Nude Wear without any primer or base:

When mixing all of the shades together, you can achieve a lighter rose blush similar to a faded version of MAC's Angelika blush (giving you that more of a coral-leaning-rose effect rather than a pure cooler-toned pink). This is warm-toned blush for those who want a natural look, it's not going to make you look like you have tons of blush on your cheeks, even if you go a little heavy when picking it up with your brush.


Conveniently this compact opens up at the back and comes with a brush and mirror as with many of Physicians Formula's products. I would give this product a solid 4/5 for wearability, pigmentation and overall conception. I highly recommend picking it up, specifically if you can get it on sale, it's a great quality drugstore blush.

Friday, May 23, 2014

Product Review: L'Oreal The One Sweep Eyeshadow

I'm sure most of you have seen this product around and have wondered if the gimmick really works. It sounds so simple. You take the applicator sponge, sweep it across the 3 color gradient provided and then sweep it on to your eye. You do this twice and you should achieve a flawless eyeshadow look. This sounds like it is particularly useful for makeup novices who are unsure of which color to place where, or for those of us who are a little bit timid when trying to create a smokey eye look.

I found this on sale at my local CVS and decided to give it a go and give my wonderful readers an honest opinion of this product!

The product itself looks like it could be used with a regular brush as well so if the applicator didn't work out, I figured I could still use this as regular eyeshadow. There's a wide array of colors but I chose 908 Smokey for All Eyes because it's out-of-the-box from what I normally wear and I wanted to try it out.


The quality of the shadows is good, they are smooth and blendable, I'm actually quite impressed by them, just as I was by the Revlon Colorstay Quads. Drugstore eyeshadows have vastly improved in recent years and they are almost just as good as the higher end brands.

First, I tried this product with nothing else added and no blending to show you what it looked like and then I worked with it to achieve more of a look that I am comfortable with.

L'Oreal The One Sweep Eyeshadow
All things considered, this product performed well, I really didn't feel like I had to apply more than one sweep to achieve the desired amount of color. I didn't particularly like the delineation between shades since you can see clearly where each color ends and the other one begins, but this was an easy fix with a shadow blender brush. 

Is this a product you must purchase? No, this is something that is more for those who are in a rush or those who don't like to change up their look as much, there's a neutral brown combination which I think suits all skin tones and occasions. 

I give this product a solid 3.75/5 - the color payoff is really good and the colors blend together very smoothly, the applicator works but you do have to go and blend it out to make it a little bit more of a wearable look (specifically with a stark color combination such as the Smokey look I chose).

Friday, April 11, 2014

Hautelook Exclusive Pucker Up! Lip Beauty Bag


I've got a great deal to share with you guys today but it's exclusive to Hautelook members (Hautelook is free to join, by the way, so if you aren't a member, go sign up!). The best part of this "mystery bag" is that it's no mystery at all! I will give you the whole list of products and even the colors they come in! Talk about smart shopping! I will also be providing you with the retail prices of each single product. As a bonus, everything comes in a cute lipstick case as a freebie bonus. The only catch is that with Hautelook, you do have to pay for shipping (which depends on your location I believe, but mine was around $7.00). Hautelook values this bag at $160 worth of products and we can buy it for the absolute steal of $24! You can purchase the bag here.


The bag contains the following items (sources are linked for the retail value):

  1. Laura Geller Italian Marble Lipstick, Sugared Maple (glazed caramel with creamy vanilla) - Retail: $18
  2. LORAC Lip Lustre Gloss, Ruby - Retail: $15
  3. Mirenesse Glossy Kiss, Flirty Kiss - Retail: $29.95
  4. Mirenesse Lip Bomb #2, Siren Red - Retail: $39.00
  5. Swoon Lip Gloss Reusable Wand - innovative cosmetic tool that is designed to retrieve every bit of gloss from a lip gloss tube - Retail: $15.00
  6. La Fresh Lip/Eye Makeup Remover Packette - just 1 of these - Retail: 0.83
  7. Lord & Berry Shining Lipstick 20100, Fire (orangey red) - Retail: $16.00
  8. Allegro Lip Gloss Case - couldn't find this anywhere
  9. Crown Brush Lip Liner Brush (synthetic hair) Retail: $3.00
  10. NYX Retractable Lip Liner, Ruby, Fruit Punch, Nectar, Nude Pink, Citrus (as far as I can tell, this is the only product with variation) - Retail: $4.50
So when everything is totaled up, I get a value of $141.28, the price Hautelook has of $160 is definitely a little bit over-inflated. But I'm not adding in the values of the lip gloss case or the makeup bag (because those, to me, with any mystery bag or subscription box, are essentially freebies).

Hope you guys enjoyed this and I hope it helps you decide whether or not you want to purchase the bag!

Also, please keep in mind what it says on the bag (at least when I'm looking at the page today)!


Happy shopping!


Thursday, April 10, 2014

DIY Concealer or BB Cream! Super fun and easy


Hi everyone,

I'm so excited to bring you this DIY. It was a really fun project that I'm sure I'll get a lot of use out of. I've always wanted to make my own concealer, so I read up on various methods and came up with the easiest and most efficient one made out of things I'm sure we all have in our households! Let me know if you like this DIY and I'll do more!


Saturday, March 29, 2014

Urban Decay Electric Palette Eyes of The Day

Since the latest craze is the Urban Decay Electric pressed pigment palette (which is now available for purchase), I love that everyone's getting into springtime pops of color! I decided to use it for my look of the day, which is a green/blue mermaid-like combination.

Here's a quick guide of the colors I used to achieve this look from the Urban Decay Electric Palette:
I started by working from the inner corner out on my eyelid. In the inner corner, I placed Revolt and patted that on gently to get a saturated color. I find that this palette works best in patting motions and gentle blending rather than swiping back and forth to get a concentrated pop of color where you want it. I then went in with Thrash on the middle third of the eyelid. I put Gonzo on the outer 2/3rd's of the lid, layering it over Thrash for a nice transition color. I used Freak and blended the colors up into my crease, making sure to go in with a clean brush to clean the top of the shade up to the browbone. Then I used Slowburn at the very top edge of my crease where I placed Freak and I made sure to blend it out so that it looks close to my skintone for a very natural warmth to the look.
On the lower lash line, I simply used Freak to line the outer 2/3rd's of the eye and carried Revolt to the inner corner of my eye.  For mascara, I used Benefit's They're Real and to line my eyes, I used Stila's sparkle waterproof liquid eye liner in Starry. The colors ended up overwhelming my eyes and they were starting to get lost in all of the color, so I decided to place some half-lashes to finish up the look (I think this makes my eyes look bigger, especially since it draws out the outer corners).

If you haven't seen my review of this palette complete with swatches, make sure to check that out if you're interested in purchasing it (since it is quite pricey at $49 for this medium-sized palette). You may, or you may not know, that there is a disclaimer/warning on the palette which states that the colors Slowburn, Savage, Jilted and Urban are not FDA approved for immediate eye usage. I interpret this as meaning that you probably shouldn't be using them on your eyelid if you have sensitive eyes but you could use them in your crease and upwards. I wouldn't recommend putting these colors on your waterline but I have used them on my eyelid and I didn't have any adverse reaction.

Thursday, March 27, 2014

E.L.F. Studio Large Brush Holder Review

A long-time favorite of mine is the E.L.F. Studio Large Brush Holder. This retails on the elf website for $15, but since they frequently have 50% off sales, I purchased mine for $7.50. It reminds me of the makeup holders that MAC has their brushes (or used to) in their stores and it looks very luxurious and high end. Don't mind the  powder smears on mine, it's well-used and well-loved. It is also very easily cleaned with a wet cloth or paper-towel, I just haven't gotten around to it for awhile.
The container itself has 3 compartments with 2 dividers, it has a matte finish with a soft rubberized feel reminiscent of the NARS packaging (which E.L.F. is notorious for duping in much of their packaging for blushes and lipsticks). These are fairly generous compartments with each one fitting more than a typical mug might (particularly because there are no tapered edges at the bottom).
The angled view of the bottom reveals that I have added some Adhestive Grips to the bottom since there aren't any on the actual product, this gives me the added security that the brushes won't all fall over if I accidentally hit it with one of my palettes when I'm in a rush to get ready. 
The overhead view really provides a good angle of just how much I was able to fit into this brush holder. My brushes are separated by type, with the left-most compartment holding eyeshadow brushes of all shapes and functions (53 eye brushes in total), the middle compartment holding foundation/concealer and smaller powder brushes (13 in total) and he right-most compartment containing large face/powder brushes (10 enormous brushes are housed here). There is even more room in each compartment and I could stuff it even more, but I like to leave room so I can easily handle my tools.

All in all, I think this is a great, inexpensive and professional-quality purchase at a really affordable price. It's not the most glitz or glam, but I find that it doesn't stick out in my room and it actually hides the fact that my brushes are so dirty (I figure a white container would probably make my brushes look VERY dirty).

Friday, March 21, 2014

Product Review: Lorac 3D Liquid Lustre Set


I recently purchased the Lorac 3D Liquid Lustre set from the Rockin' Red Hot Collection (this came out for the holidays). I got it for $16 on Hautelook, which I thought was definitely a steal compared to the $28 it retailed for originally. These are sort of a strange formula which originally looks like 2 layers, one is a bunch of dense glitter that settles to the bottom of the glass container and the top is a more clear tinted liquid. Before usage, these should be shaken well to mix the glitter and the medium.

The color choice gives a nice variety of looks which can be achieved, but the one thing I believe they all have in common is that they shine in the evening, which I think is the ideal time to pop these on top of your muted daytime look to achieve a glittery party look! This product feels luxurious and high end and is not associated by a particularly high price tag - considering I only paid $4 per each of these, they definitely feel worth it! I love rocking glitter (even during daytime) and these can be used on your eyes, face, and anywhere else on your body you want to sparkle!

Here's a look I spruced up with a little bit of the Amethyst sparkle! It gives a nice subtle finely milled glitter which easily applies with a brush (or your finger) and you can make it more or less dramatic depending on how much of the product you layer on.
Look created with Wet n Wild palette "Flirting at the After Party", Lorac 3D liquid luster in Amethyst, Jordana Best Lash Extreme Volumizing Mascara, Jesse's Girl liquid eyeliner, Rimmel Scandaleyes waterproof kohl in Nude, Starlooks Gem Pencil in Topaz, and Milani Liquif'Eye metallic eye liner pencil in Black 


Without further ado, here are some swatches:
Lorac 3D Liquid Lustre Set - Indoor Light
 You can create a look with less or more sparkle, depending on how you concentrate the formula on your eyes, it will dry and completely set - this is much more mess-free than applying a medium and then glitter on top with a brush. These definitely take the guesswork out of which medium you should use and which glitter is eye-friendly. I do not recommend using these on your waterline, however, as no glitter is ever safe to use that close to your eye (it can be quite painful and even scratch your cornea if it goes inside your eye).
Lorac 3D Liquid Lustre Set - Flash
 As you can tell, with flash photography, these look absolutely metallic and stunning. The diamond shade veers a little pink even though it is meant to be colorless.
Lorac 3D Liquid Lustre Set - Day Light

Thursday, March 13, 2014

How to Get a Dewy Complexion


1. Exfoliate - make sure you wash your face with a gentle exfoliater with microbeads (as these tend to be the most effective) or use your cleanser with a soft silicon exfoliating pad. These should be done about 3 times a week for ideal results. I don't recommend doing extreme chemical peels as these can sometimes cause harsh skin reactions and may remove even healthy skin layers. The ideal exfoliation practice removes only the oldest, dead skin cells on the outermost surface of the skin and reveals the healthy, glowing layer underneath. Sugar scrubs, salt crystals, pumice, loofahs, sponges and microfiber cloths all can achieve the same results. Getting rid of dead skin cells and build-up naturally means that your makeup will go on smoother and you will avoid nasty clumps.

2. Moisturize - you'll want to use an emollient to make the outer layers of your skin more pliable and soft, this increases the skin's hydration level (or water content). Usually moisturizers tend to be a little bit fatty and may have a greasy feeling on the skin, but these lubricants really do make an enormous difference to the way your makeup (specifically foundation) will apply and last on your skin. If you have dry skin, it is extremely important to use a heavier moisturizer or even a dry oil - this will reduce your makeup's patchiness if used well in advance of application.


3. Use a liquid highlighter and a moisturizing foundation - Some women prefer to use their highlighter over top of their foundation, however I have found that for the most natural looking results and to blend your highlighter seamlessly into your foundation, you will want to mix the highlighter you are using (in my case this is the Stila All Over Shimmer Liquid (Shade 03 - Rose Gold)) with a moisturizing foundation of your choice (my favorite is The Body Shop Moisture Foundation in Shade 04). I use equal parts and mix them on the back of my hand with the Real Techniques Expert Face Brush.
Equal parts liquid highlighter (Stila All Over Shimmer)
and foundation (The Body Shop Moisturizing Foundation)
Mixed together on the back of my hand with Real Techniques Expert Face Brush


4. Highlight and contour your face - For a maximized dewy complexion, apply a powder highlighter (such as Stila's Kitten Highlighter) to the areas on your face which should reflect light and a bronzer (such as Wet n Wild Coloricon Bronzer - Ticket to Brazil ) to the areas on your face you would like to recede to the background. Here's a handy infographic on highlighter/bronzer placement.


Thursday, March 6, 2014

Liquid Cream Shadow Formulas

From left to right: Almay Intense I-Color liquid shadow (054 for green eyes), Too Faced Glitter Glaze (Silver Spark & Goldie Rocks), EyeTini Shadow Tint (Ambrosia & Violette), Jane Cream Shadow (Lilac & Gold) 
Lately, I've discovered a new-found love of liquid formula cream eyeshadows. I find that the pigments usually have great color payoff and the application is so simple with a doe-foot or wand applicator (as opposed to having to use my fingers as with my beloved Maybelline Color Tattoos). I have a variety of different shades and types so I figured a quick review of them could be helpful for those of you looking for an easy application of wearable color.

I do want to say that these colors are all somewhat shimmery or reflective, they are not matte at all but I actually prefer this look on the eye, rather than an all-matte look. You can, however, always layer them with any finish of eyeshadow you want for a more potent color and extra dimensions.

Swatch Reference Photos:
Swatches Photographed with Flash - From left to right: Almay Intense I-Color liquid shadow (054 for green eyes), Too Faced Glitter Glaze (Silver Spark & Goldie Rocks), EyeTini Shadow Tint (Ambrosia & Violette), Jane Cream Shadow (Lilac & Gold) 

Swatches Photographed in Natural Light - From left to right: Almay Intense I-Color liquid shadow (054 for green eyes), Too Faced Glitter Glaze (Silver Spark & Goldie Rocks), EyeTini Shadow Tint (Ambrosia & Violette), Jane Cream Shadow (Lilac & Gold) 


The beginning of this fascination with cream shadows began with the Too Faced Glitter Glazes which are absolutely breath-taking (they are the 2nd and 3rd swatches from the left). I believe these are currently on sale at TooFaced.com for $9 each (that's an ABSOLUTE steal) because they're limited edition (original price was $21)!!! These function either as a stand-alone eyeshadow or a glittery-tinted top-coat for your eyeshadows.


The Almay Intense I-Color liquid shadow (first swatch from the left) is probably the one that impressed me least, I think the formula is a lot more sheer (although it is buildable) and dries more quickly than all of the others. This sort of forces you to work quickly when putting it on your eyes. I do think the colors are quite beautiful and neutral, however, so if I can find any more of these on clearance or sale, I will pick them up.


My February IPSY Glam Bag rekindling my love for liquid shadow formulas when they included EyeTini Shadow Tint in Ambrosia (4th swatch from the left) and I loved the full coverage so much and intense pigmentation that I absolutely had to order Violette (5th swatch from the left) off eBay. These are the absolute perfect formula, it's not too thick but also not too thin, they don't bunch up, don't crease, and are super easy to blend with powdered eyeshadows as well. I'm not a huge fan of the Tini brand, but this product is definitely giving me a much more positive outlook on them.
And finally, a brand that has seen a recent revival (specifically at Ulta) is Jane (the last 2 swatches from the left). I hadn't picked anything up until I saw these cream shadows even though I saw many glowing reviews of the brand on YouTube from fellow beauty bloggers. These shadows are very reasonably priced (around $8) and they have a very wide selection of colors. The only difference between these and the EyeTini shadows is that these tend to reflect a little bit metallic. Try not to deposit too much product because it can bunch up and create flakes (I find this happens sometimes with MAC Paint Pots in vivid colors as well). These are a great buy and I've really enjoyed using them alone and as a base coat for other eyeshadows!


Let me know if there are others you guys prefer in the liquid formula - I'd love to get my hands on some more and continue experimenting!

Wednesday, March 5, 2014

Maybelline Color Tattoo Limited Edition Collection "Dare To Go Nude" Swatches

Maybelline Dare To Go Nude Color Tattoo Collection. Credit: nouveaucheap.blogspot.com

The beloved Color Tattoos by Maybelline are getting new shades! For a limited time only, these exclusive shades from the "Dare To Go Nude" Collection will be available at Walgreens, Duane Reade, and CVS (I can only confirm these retail locations for now).

I checked out the shade range and was expecting to see some new colors, I was a little bit disappointed because I only thought the shades "Caramel Cool" and "Stroke of Midnight" were unique from the line-up. Swatches of the entire line-up can be seen below:

Maybelline Dare To Go Nude Color Tattoo Collection Swatches. Credit: nouveaucheap.blogspot.com

I was so excited about this collection in its entirety until I saw it in my local Duane Reade. When I compared the first two lightest shades ("Pure Nude" and "Beige-ing Beauty") they looked so incredibly similar to "Barely Branded" from the premanent Metal collection. I already have the whole Metal collection so there was no reason for me to pick up 2 more colors which looked identical to the naked eye (especially once they're blended out or used as a base). The next colors, "Nude Complement" and "Sleek & Spice" were very close to "Tough as Taupe" and "Bad to the Bronze", respectively. I'm just not thrilled about those shades so I didn't pick them up, either. That really, unfortunately, only left me with "Caramel Cool" and "Stroke of Midnight" by default!

Maybelline Dare To Go Nude Color Tattoo Collection - Caramel Cool and Stroke of Midnight

 I was most excited by "Caramel Cool" as it is an absolutely beautiful crease and transition color, especially for fair skin. "Stroke of Midnight" is a little bit patchy, as you can see from the swatches below, but it is definitely workable and I would only consider using it as a base to make colorful eyeshadows pop and transform shades.
Caramel Cool and Stroke of Midnight -  Natural Light
Caramel Cool and Stroke of Midnight - with Flash
 Maybelline releases at least a few Limited Edition collections a year and with my already absurd stash of these, I reserved myself to buying only the ones which were unique to my collection. There's a good amount of product inside of these pots so unless you exclusively use these (and you know I sure don't with my vast collection of makeup!). Let me know if you guys picked any up and what you think of the collection!


Related Posts Plugin for WordPress, Blogger...