Showing posts with label DIY. Show all posts

Tuesday, October 8, 2013

DIY: Chrysanthemum Starburst Mirror

Photo Courtesy of Little Things Bring Smiles

Want to know the secret to making these beautiful mirrors? It's much simpler than you may think: plastic spoons. That's right, you need very few materials in this simple at-home DIY. Make sure you get all of your materials as cheap as possible, the purpose of this DIY is to save you money on a priceless piece of wall art that will be unique to your space.

You will need:


Here are the steps you should follow to achieve this beautiful wall decor: 

Trace around your mirror onto your foam core or thick cardboard

Use your homemade compass (string tied to your pencil to draw the diameter and hold down the inside portion of the string with your finger) and measure out an inch (this will be for one row of spoons)

Depending on how many rows you want to make, go that many extra inches and draw the diameter of the circle with your pencil compass on every inch as a guide

Cut your foam core or thick cardboard around the outermost circle you have drawn

Cut out the center-most circle as this will be where you will glue your mirror on from the reverse side (if you are going for a recessed look). Skip this step if you plan on gluing your mirror to the front of the piece so that it lays atop the petals

Cut your spoons up, removing the handle from the base of the spoon

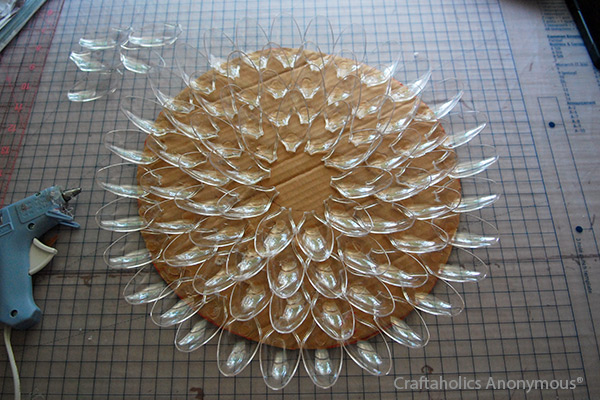
Start hot gluing the base of the spoons upwards (so that they stand out three dimensionally like flower petals)

Work in sections, start around the outside of your design and leave about an inch between each petal

On the 2nd layer, make sure you place your petals in the gaps you left on your first layer

Keep moving inwards in layers until you have reached the center on approximately half of your decor piece. Complete the other side of your piece.

If you chose to color your flower, then spray paint your petals in a well ventilated area and make sure to get the backs of the spoons as well so that they don't look dual toned from the sides (unless you're trying to achieve this effect). If you want to achieve a dual-toned effect or multi-colored effect you're going to have to paint your spoons and let them dry before gluing them down.

Apply a second coat of spray paint to the petals for a more full coverage finish (glossy or paint is also an option). Allow your petals to dry elevated.

Hot glue your mirror either to the front or the back of your piece (depending on if you want it to look recessed or like it's coming out of the flower) but make sure to only use the hot glue around the edges and that it does not become messy - you are gluing to the foam core or thick cardboard

Apply the mirror hanging kit to the back of your piece, this is really easy with foam core because you can just push nails into it if you don't have a wall-hanging kit and it will just stand on your wall


You can even try this project with a photo frame or clock!


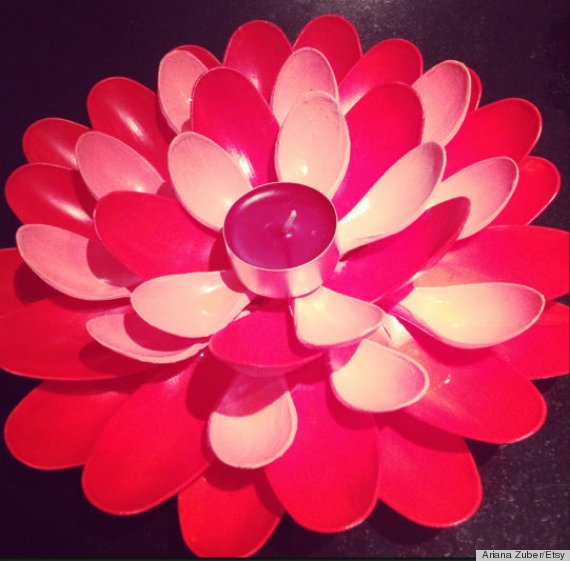
What else can you make out of plastic spoons?


Remember, you can always go the easy route and avoid purchasing spray paint and the mess of painting altogether and get colored spoons! And don't force yourself to stop at just one color... you can design a rainbow! You can buy huge quantities of spoons in bulk for very cheap prices, so play to your heart's delight.


Monday, August 20, 2012

DIY Anthropologie-Inspired Hip Cinched Blouse

This is a fabulous DIY t-shirt idea that can be translated into all sorts of different pieces - you can use this technique on the bottoms of shirts, skirts, pant legs, etc. It's really an idea you can take anywhere your creativity guides you!


All you'll need for this project is:
A shirt
1 piece of fabric
1 ribbon
Sewing machine (or your meticulous little fingers and a needle with some color-coordinated thread)


1. Find a shirt and turn it inside out.


2. Lay your ribbon down and cut a piece of fabric large enough to cover your ribbon and pin the piece down


3. Sew on the fabric, making 3 large stitches, between the ribbon and on each side.

4. Cinch and tie and you've completed your project!


Monday, April 16, 2012

Making Hair Clips out of Dangle Earrings

If you have dangle or chandelier earrings which are missing their mate, you may want to consider transforming them into hair clips. I have quite a few that I am in love with but have lost the other one so I can no longer wear them as an earring pair, this is a wonderful transformative idea which can still allow you to get joy and use out of your jewelry.

All you need for this project is earrings, bobby pins, pliers, spring ring (if the earring doesn't have one), and glue (either from a hot glue gun or Gorilla Glue). You can do a variation of this project using chopsticks (if you use a drill to drill a hole through the chopstick and cut it down to size you can attach your earring to the end and use it as hair chopsticks).


First, you should open up the earring from the earring hook with pliers and make sure you add the spring ring to the earring afterwards where you want it to attach to the bobby pin. You can consider coloring the bobby pin with nail polish if you want to add a pop of color or you can skip this step. All you need to do is hook the closed spring ring onto the bobby pin and pull it through to the end. Use a dab of glue where the ring attahes to the bobby pin and make sure that it sticks down so that it doesn't move while it's in your hair. Make sure you don't glue the bobby pin closed, and let the earring dangle beautifully from your hair. This accessory will definitely make a statement, especially if you use a nice vintage earring that pops. If you don't have dangle earrings to do this, you can use studs that you cut the backing off (either with scissors or jewelry cutters) and then glue the earring backing onto the bobby pin and let it set. Voila, either way, you will have fantastic looking pins!


Friday, March 30, 2012

Tuna Can Heart Bowl

This project is so beyond adorable that I cannot get over it. I saw this photo and I thought "wow that's a beautifully artistic bowl, I wonder how it was created" and then I delved deeper into the mystery to find out the shocking truth that it's merely a tuna can!!!


The steps to make this beauty are as follows:
1) Open and empty out a can of tuna, fruit or anything else that is approximately the same size
2) Clean the can out thoroughly
3) Bend the can with your fingers in the shape of a heart (make sure not to cut your fingers and smooth out any edges with sand paper)
4) Spray paint the can with a color of your choice, in this example white was used


Voila! You have a beautiful keepsake box for you to put your little trinkets and baubles!


DIY T-Shirt Reconstruction


Do you get sick of your T-shirts? Do you have some laying around that are years and years old but you've never worn them because the neck hits too high on your collarbone and bothers you? Do you just really dislike a shirt because it is ill-fitting and unflattering on you? Well, I have tons of those shirts that I can't throw out because they have some sort of memory attached to them or they're not bad per se but I just don't wear them. I came up with the perfect solution: modifying old t-shirts to look like brand new, stylish tops.

I have, at the bare minimum, been altering sleeves and necklines on t-shirts lately and it completely reconfigures the fit. You can opt for cap sleeves, instead of regular sleeves, maybe even transform your tee into a tank or cut-off shirt, and the neckline can be changed from that basic circle shape into a V-neck or low-neckline so you can wear your t-shirt off one or both shoulders. If you find they accentuate your tummy area in unpleasant ways then you can snip the bottom hem of the t-shirt, you can round it out so that it gives the t-shirt a more feminine (as opposed to unisex) base. You can also make cool designs by cutting slits into your t-shirt and then braiding them together (it's even simpler than braiding, all you have to do is loop one segment over the next).

All you need to do this is either a fabric scissors or just a regular scissors (you'll need a little more patience to cut straight lines), you can score where you want to cut for precision, but I don't even bother with that. It's so simple, just make sure you cut the same distance from both sides of the t-shirt so it doesn't end up looking uneven or asymmetrical (unless you're looking for an asymmetrical look, it is your own unique fashion after all).

Once you get more advanced with your snipping and braiding, you can transform your shirts into some amazing fashion-forward pieces:


Tuesday, February 28, 2012

DIY: Make your own deodorant

Nowadays, we all try to be as healthy and focused on eating organic and lifestyle improving things, but we still use products that are harming us without our knowledge. In the spirit of being as health-conscious as possible, and trying to eliminate all the harmful toxins I've written about in my article "Deodorant Expose", I decided to show you this recipe for making your own deodorant. It's a hard deodorant, kind of like hard perfume, but it lasts a long time, is very refreshing and smells better than most of your store-bought deodorants ever will. The added bonus is that it's very healthy for you and you can't go wrong, you can apply it as often as you'd like.


Ingredients:
1/4 cup Baking Soda
1/4 cup Arrowroot Powder (you can find this in health stores)
4 tablespoons Coconut Oil
10 drops of essential oil (any flavor you choose)
A jar with a lid


First in a small bowl, mix up all the dry ingredients. Then start to add the oils a little at a time. Mix with a fork or any other mixing utensil until you get the consistency that you like. If you put it in the microwave for about 15 seconds it will soften the mixture, of course this depends on how strong your microwave is. It makes it liquid consistency which is much easier to stir and put into your jar if you're having trouble doing it the other way. It will solidify as it cools off.

To apply to your armpits, you take a small amount in your fingers and kinda warm it up but rubbing your fingers together, then rub it in each armpit. You only need to apply it once! The other nice thing, no more deodorant marks on your shirts! Also, this is inexpensive to make and the ingredients won't expire on you for a long time.


Here are all of the ingredients you will need to make quite a few of these deodorants (you can give them away as party favors or gifts to your dearest friends):

Thursday, February 23, 2012

Sponge Manicure Nail Tutorial

This is the look the tutorial will give you, apply a final coat of fine clear glitter if you do not want a matte finish
Sponge manicures are increasingly popular and easy do-it-at-home-yourself projects. You can create a myriad of various color and shape combinations to create the most interesting manicures you've ever seen. This is not a manicure for those who are all about perfection because the randomness is what creates beauty in this type of look. So if you like speckles and soft blends of colors as well as gradients, this is the manicure for you!

What you'll need:
- Base coat
- Base color
- Paper towels
- Sponge (either art sponges or makeup sponges)
- Tweezers
- Nail polish colors of your choice - one bottom color, and one intermediate color between base color and tip color
- Top coat
- Glitter (optional)
- Acetone
- Q-tips

I suggest first trying this look with a white base color as any other accent color will look vastly different compared to the white coat and you can easily see what you are doing with the sponge, allowing you better control of your technique. Make sure not to buff your nails, because you want them to be slightly gritty for this manicure because if the nail is porous, instead of smooth and shiny, you will have an easier time applying your color. Make sure that before you start anything, you lay down a paper towel so you don't ruin the desk you're working on with polish. First, apply your bast coat of nail polish and let it thoroughly dry. Then, apply your base color (white in my case) and make sure to concentrate it on the lower third of your nail near the cuticle but lightly coat the entire nail. You will not need more than one coat of this base color.

You can then apply an intermediate color on the middle third of your nail (if you chose to go with blue as the tip color then you would want to pick something like a lighter baby blue to make it look like a gradient going from white to blue). Make sure to apply this intermediate color to the middle third of your nail using a sponge portion that you have ripped off an art or makeup sponge and holding it gently with your tweezers. Make sure not to over-saturate the sponge with polish, it may be a good idea for you to wipe any excess polish onto a paper towel before applying it to your nail. In the sponge manicure, less is more, you want to build it up rather than have to take away polish (which usually will result in having to start the manicure over again).

Then, to apply your tip color, which should be the darkest of the colors you have chosen, for example a fully saturated blue or one with glitter in it, you should use another sponge after your previous coats have completely dried. You don't want to apply the colors while the previous application is still wet because they will muddle together and the stickiness of the previous coat will ruin the manicure. If you find that your gradient is not sufficient, you can go back in with the sponge and dip it alternating in both colors to go over the line where the colors meet to improve the gradient. Let everything dry and apply a top coat, especially if you've chosen a glitter nail polish to add to the tips so that the glitter doesn't move and to make your nails appear shiny as well as for staying power. Use some acetone and q-tips to clean up around the sides of your nail if you have gotten nail polish on your fingers.
Starting with a blue base and finishing with a green tip, covering with green glitter will give you this look
Starting with a pink/mauve base and princess pink in the middle and finishing with a white tip you can get this look by adding bronze colored lines with circular tips using a toothpick or fine-tipped brush
Starting with a red base, orange middle and yellow tip, and drawing on palm tree silhouettes with black will give you this


If you're interested in purchasing a kit to get you started, Konad makes a wonderful one that you can purchase here (btw this is a great deal because these usually sell for around $20):


Friday, February 17, 2012

DIY: Make Your Own Lip Scrub

Last weekend, I went into LUSH and impulse-bought a 'Bubblegum Lip Scrub' for $8, which is very pricey considering it really is just a sugar-based product that you scrub your lips with to smooth them out before applying lip balm or lipstick. I'd never tried lip scrubs before so I decided I would purchase this one to see what they should be like. I later noticed that I could make my own very simply so I figured I would save you all the time and money of going to LUSH and purchasing one (or getting one from any other makeup house, to be frank) by teaching you how to make your own.


What you'll need:
- Sugar in the raw (brown sugar but you can use white if you don't like or own brown sugar) - you want the sugar to be very coarse and not finely milled
- olive oil
- vaseline or petroleum jelly
- 100% aloe vera gel (come in container from drugstore or if you have a natural aloe plant you can squeeze it out of the leaves)
- chapstick or flavoring and food coloring of your choice (some people use honey but it is too sticky for my preference but it is always an option)
- clear glass jar (you can use any jar but I think it looks better in a small clear jar that you can easily carry around - small baby food container works very well for this)

You'll want to use about a teaspoon of vaseline, half a teaspoon of aloe vera gel, one quarter teaspoon of olive oil, one third of a chapstick (cut it off the stick) or smaller amounts of your flavoring/coloring agents, and as much sugar as will fill up your container and mix it all together until you get a paste-like consistency and the color/flavor is even throughout your jar. You  may want to mix it all in another bowl and trasfer it into your jar later, I find that this allows you better control over the consistency you're getting. When you are finished, this will be instantly gratifying because you can use it right away, it doesn't need to be stored in the fridge or anything like that, and you can use it as often as you'd like without worrying about how much it cost for you to purchase it because you can remake it anytime!
Related Posts Plugin for WordPress, Blogger...